Introduction
In this article, I will guide you step by step so you can calculate your electricity bill using Home Assistant. With the Energy Panel, you can create entities and perform calculations that will allow you to visualize both consumption and fixed electricity costs. You will learn how to calculate your electricity bills for the current month, previous months, and even each day, which will help you control and optimize your consumption.
Preparation
Before starting, there are some important points you should keep in mind.
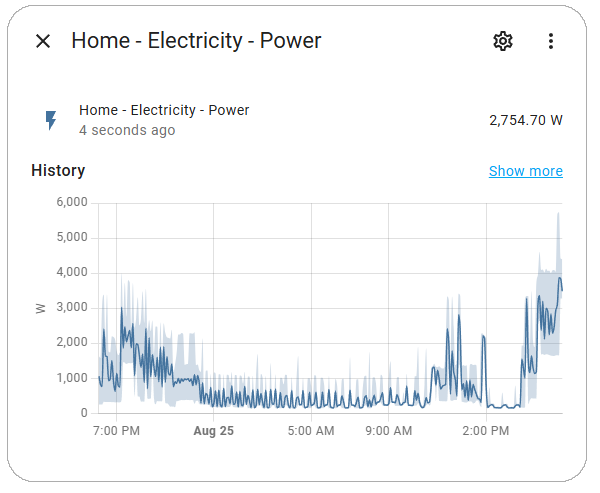
First, it is essential that you already have your consumption integrated into Home Assistant. This means you should have a sensor-type entity that indicates the watts your house is consuming at any given moment or that increases with the watts you consume throughout the day.
If you don’t have this consumption yet, don’t worry. There are various products on the market to obtain your home’s consumption, such as the Shelly EM or the Sonoff Pow CT. Make sure to install them carefully and, if necessary, seek professional help. I will soon be writing articles with some example devices for this purpose.
Vamos a trabajar con el lenguaje de plantillas Jinja. Si nunca has trabajado con él, tranquilo, aunque parezca complicado verás que enseguida te irás familiarizando y viendo cómo funciona.
We will work with the Jinja template language. If you have never worked with it, don’t worry, although it may seem complicated, you will quickly become familiar with it and see how it works.
Finally, have an electricity bill on hand to consult the different values we will use.
Now, let’s get started!
Your Consumption
Home Assistant and electricity companies calculate the amount of energy in watts consumed in an hour (kWh) from all the power measurements that hour. To perform this sum, the integral calculation approximation is used.
To better understand it, the areas of the rectangles that fit within the line formed by the consumption during an hour are summed. The more values or power measurements we have, the more accurate and real the calculation will be.
Verify Sensor Unit of Measurement
- If your sensor’s unit of measurement is Wh or kWh, you can skip to step 4.
- If not, from
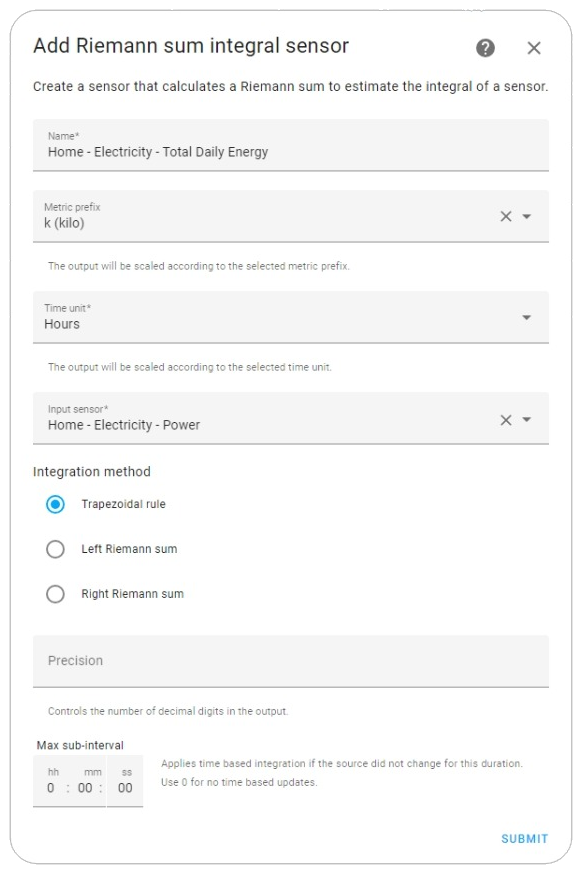
Settings ➡ Helpers ➡ Create Helper, create an Integral Sensor helper.
Configure the Integral Sensor
Assign a name, for example, “Home - Electricity - Total Daily Energy”.
In Metric Prefix, select “kilo (k)”.
In Time Unit, select “Hours”, which is how often we want the calculation to be performed.
In Input Sensor, select the entity that measures the watts consumed by your house.
In Integration Method, select “Left Riemann Sum” or “Trapezoidal Rule”.
We need to select this option because, in the case of energy, new measurements will be added as time progresses, always to the right of the graph. No new data will be included in past hours.
Save and Verify New Entity
- Save the changes, and you will see a new entity created. Initially, it will have a value of 0 kWh until one or two hours pass and the first calculation is performed.
Add Consumption in the Energy Panel
- Go to
Settings ➡ Dashboards ➡ Energy. - In the Electric Grid section, click on “Add Consumption”.
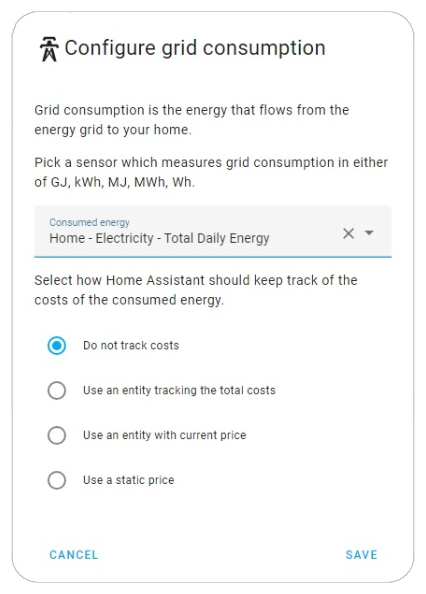
- On the next screen, in Consumed Energy, choose the newly created sensor “Home - Electricity - Total Daily Energy”.
- Check “Do not track costs” for now.
- Go to
View Consumption Graph
- In the left sidebar, access the Energy Panel.
- Wait about 2-3 hours to see the consumption graph of your house.
Most guides and videos end here. We will go a few steps further to get the most out of the Energy Panel.
Consumption Prices
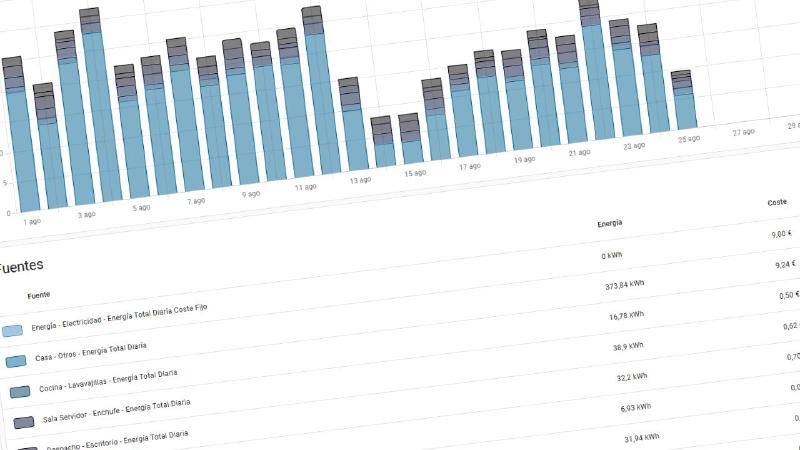
In the Energy Panel, we have buttons available to select the date range we want to display. This is very useful as we can show the data for today, how much we have consumed this month, or even calculate how much we have spent in different billing cycles by simply selecting the range that appears on the bill.
All this data is fine, but we are not only interested in consumption; we also want to know how this consumption translates into money. Next, we will calculate the price per kWh, adding taxes and VAT. We will start with the most basic rate and add options as the rates become more complex. Do you have the bill on hand? You will need it!
Fixed Rate
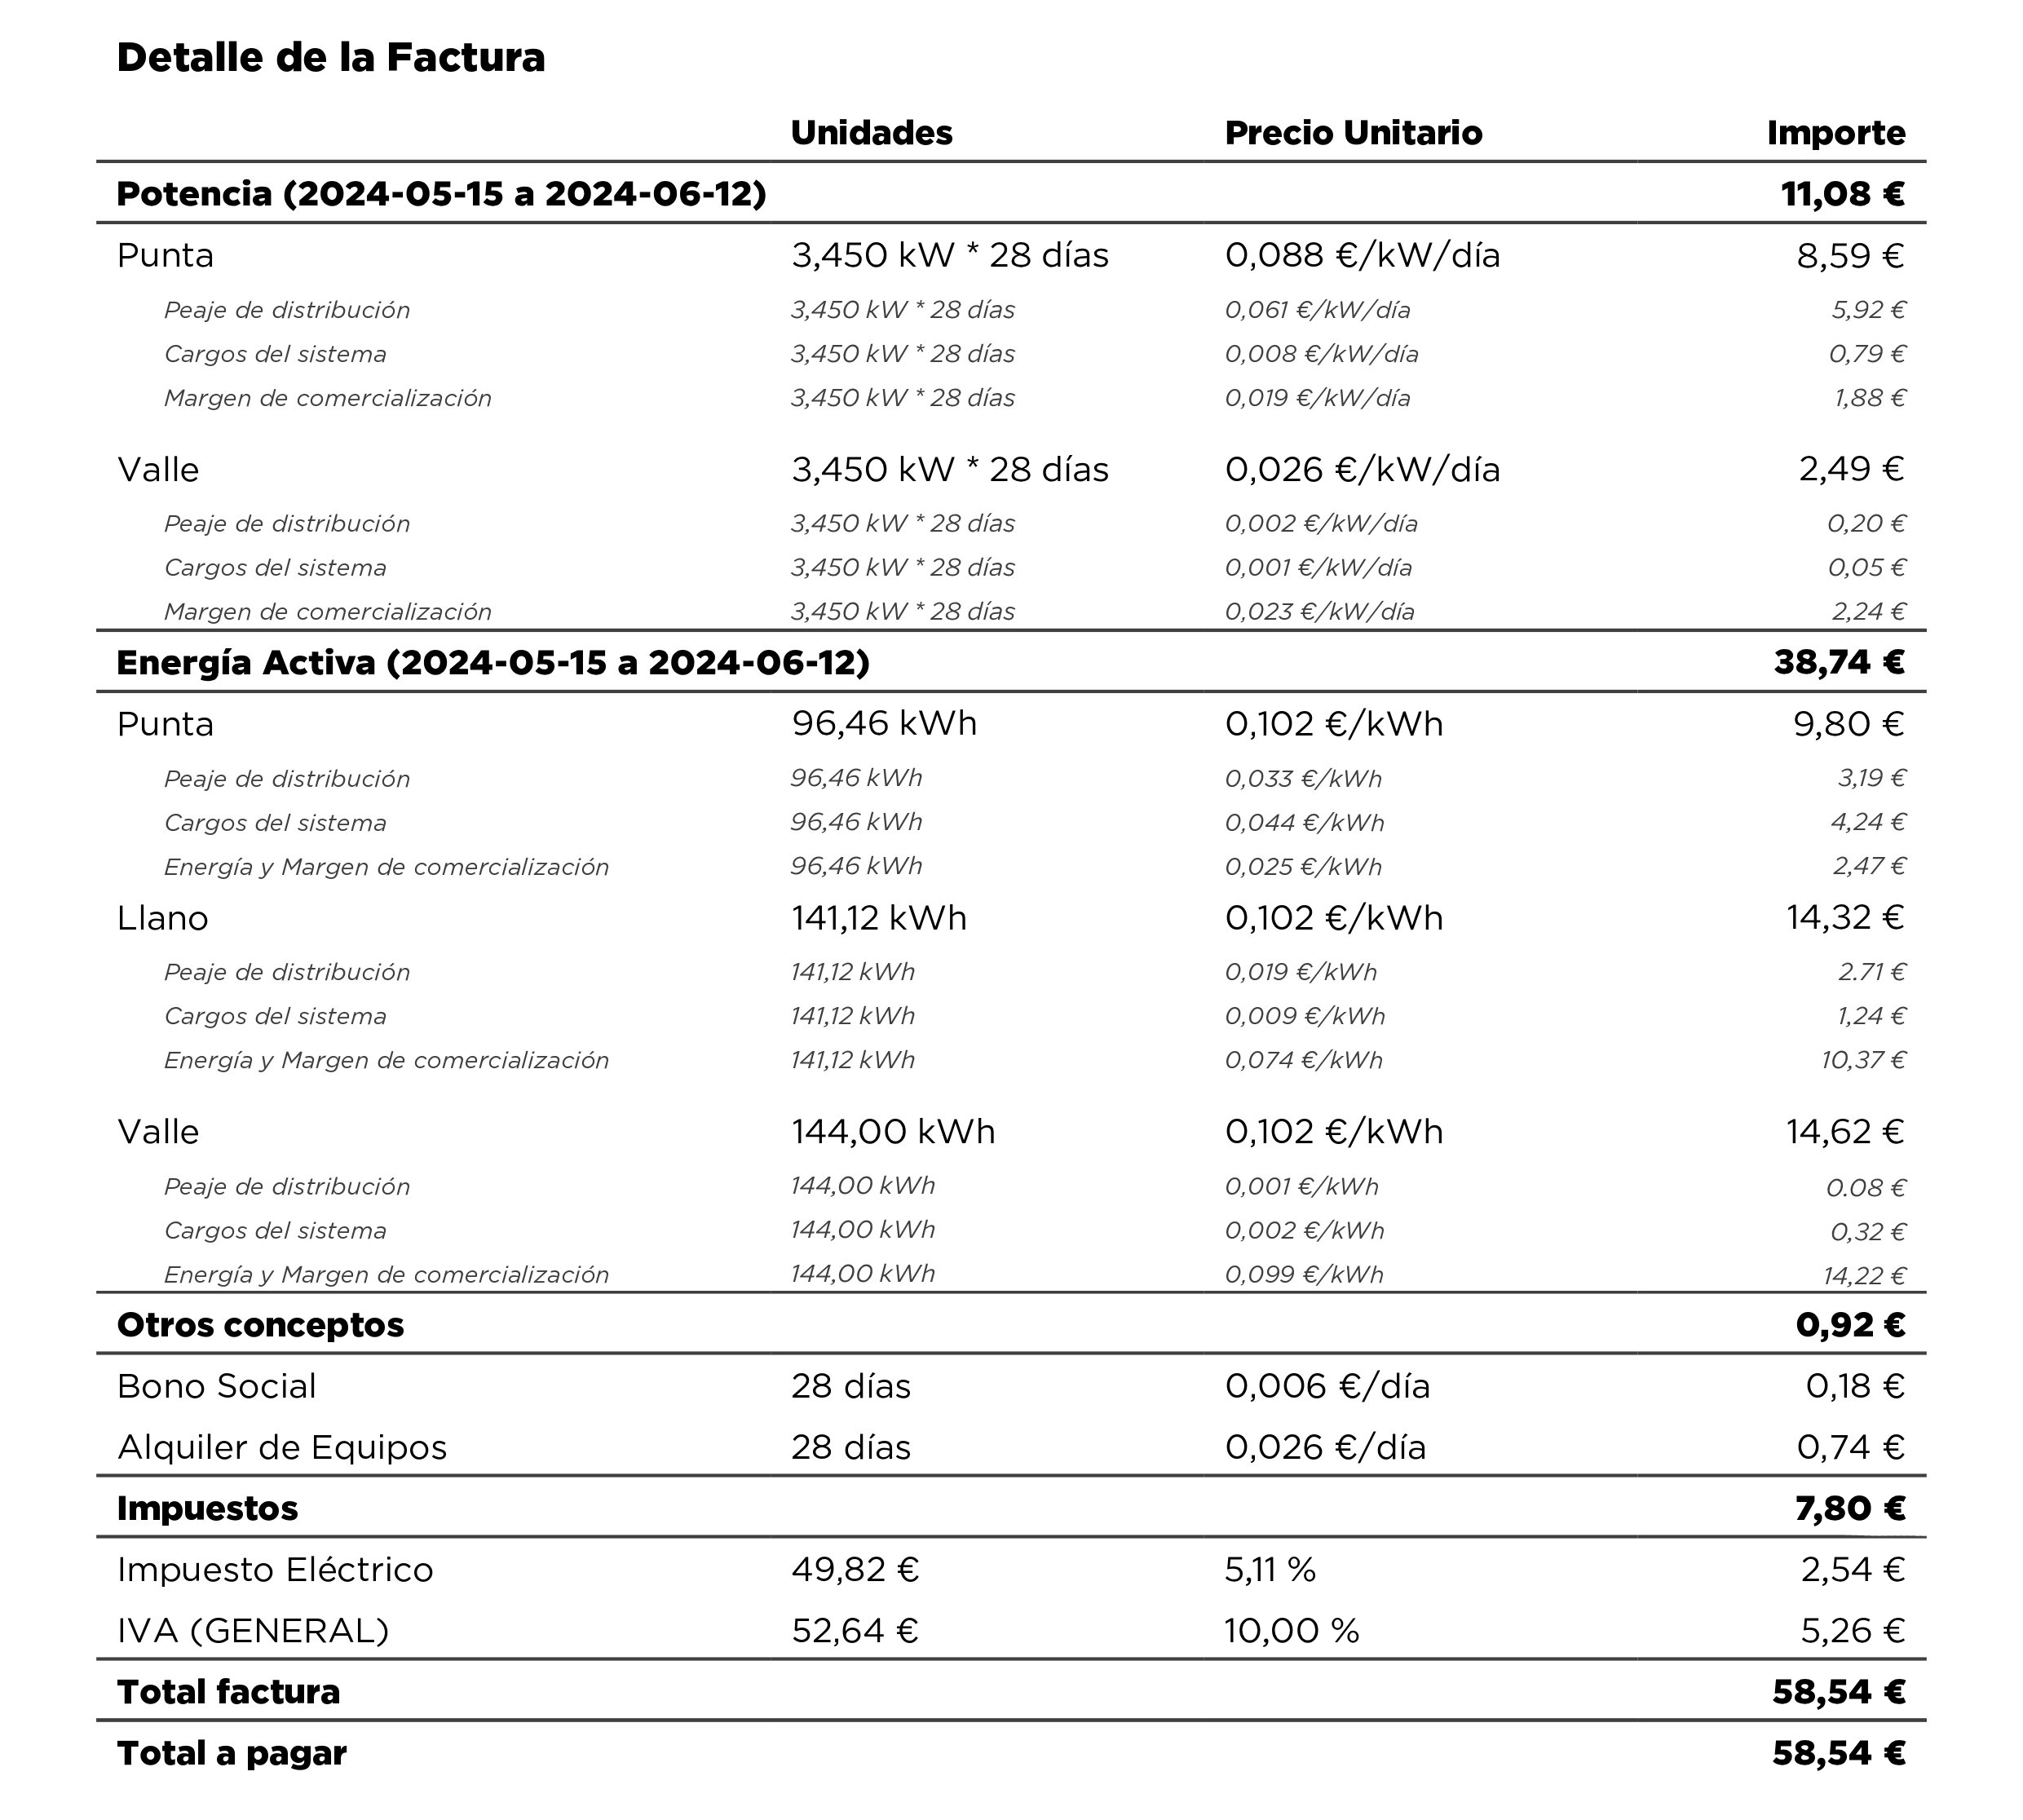
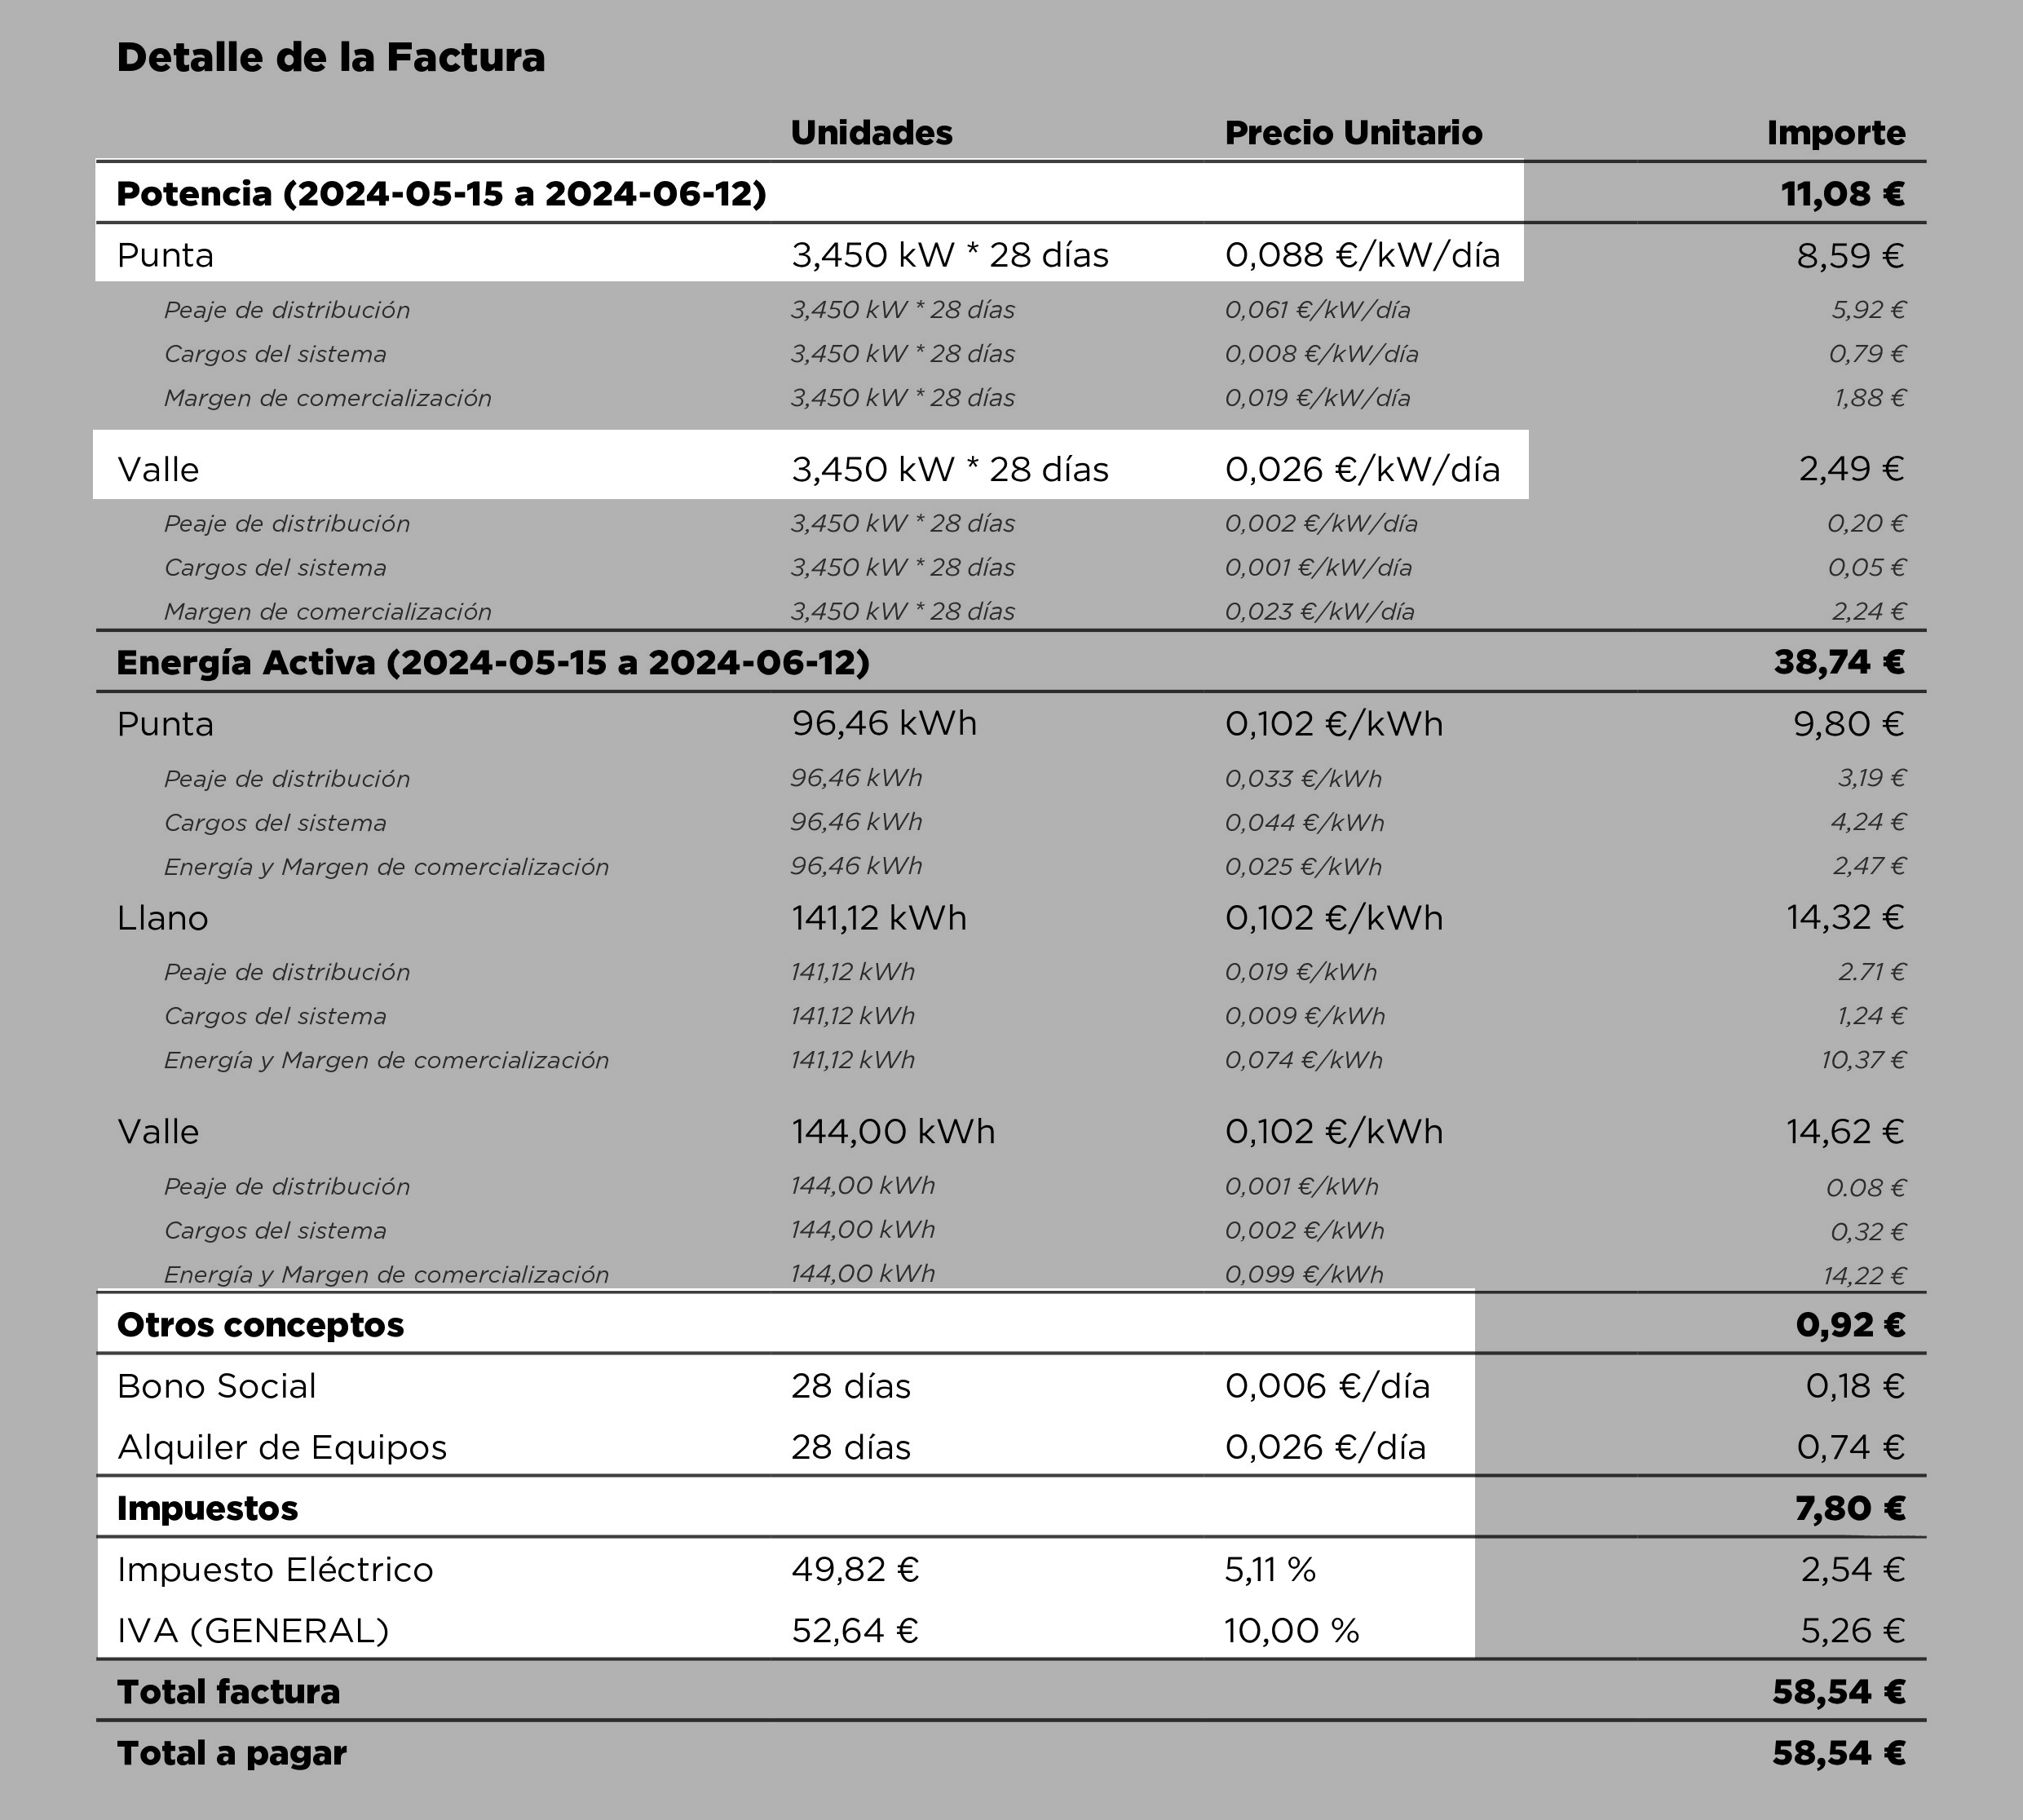
We start with the simplest rate, the one that has a fixed price for consumption, without segments or schedules. You will have a bill similar to this, indicating only one price in the consumption section.
From
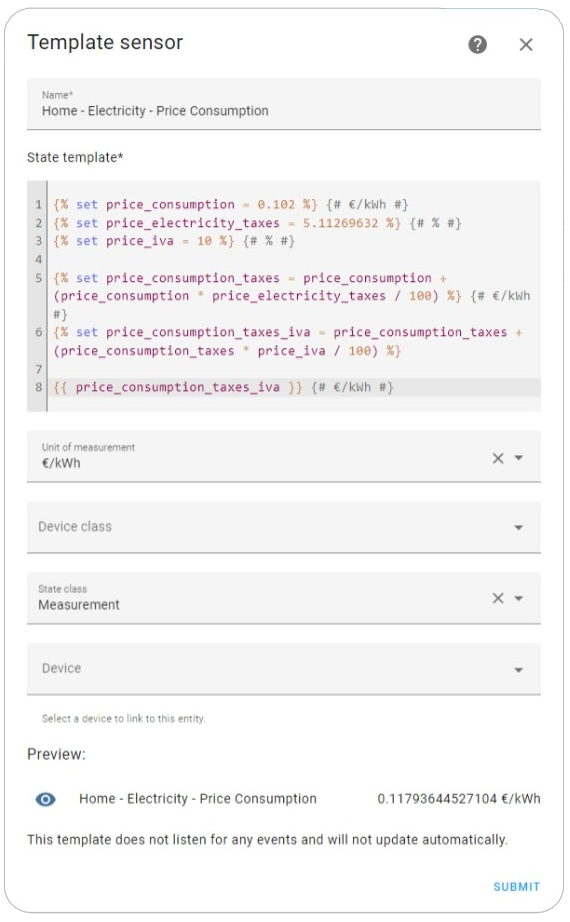
Settings ➡ Devices & Services ➡ Helpers, create a new Template helper of type Template Sensor.Assign a name, for example, “Home - Electricity - Consumption Price”.
In State Template, paste the following code:
1
2
3
4
5
6
7
8
{% set consumption_price = 0.102 %} {# €/kWh #} {% set electricity_tax = 5.11269632 %} {# % #} {% set vat = 10 %} {# % #} {% set consumption_price_with_tax = consumption_price + (consumption_price * electricity_tax / 100) %} {# €/kWh #} {% set consumption_price_with_tax_and_vat = consumption_price_with_tax + (consumption_price_with_tax * vat / 100) %} {{ consumption_price_with_tax_and_vat }} {# €/kWh #}Replace the first three variables:
consumption_price,electricity_tax, andvat, with the numbers that appear on your bill with these concepts.In Unit of Measurement, select €/kWh.
In State Class, select Measurement.
Device Class and Device can be left blank.
Click Submit.
PVPC Rate
If your rate is PVPC, the sensor gets a bit more complicated, not much, but it requires a bit more work.
The Voluntary Price for Small Consumers (PVPC) rate is available as a native integration in Home Assistant.
From
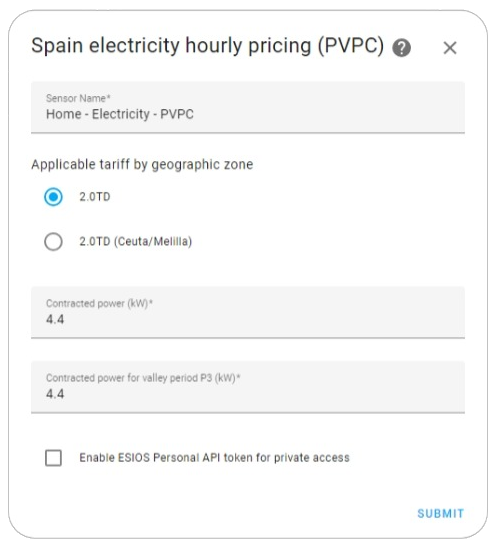
Settings ➡ Devices & Services ➡ Integrations. Click on Add Integration and search for PVPC.Select Spain electricity hourly pricing (PVPC).
Give it a descriptive name like “Home - Electricity - PVPC”.
Select 2.0TD (Ceuta/Melilla) if you live in Ceuta or Melilla, otherwise, the 2.0TD option.
In Contracted Power, enter the kilowatts you have contracted with your rate, which should appear on your bill.
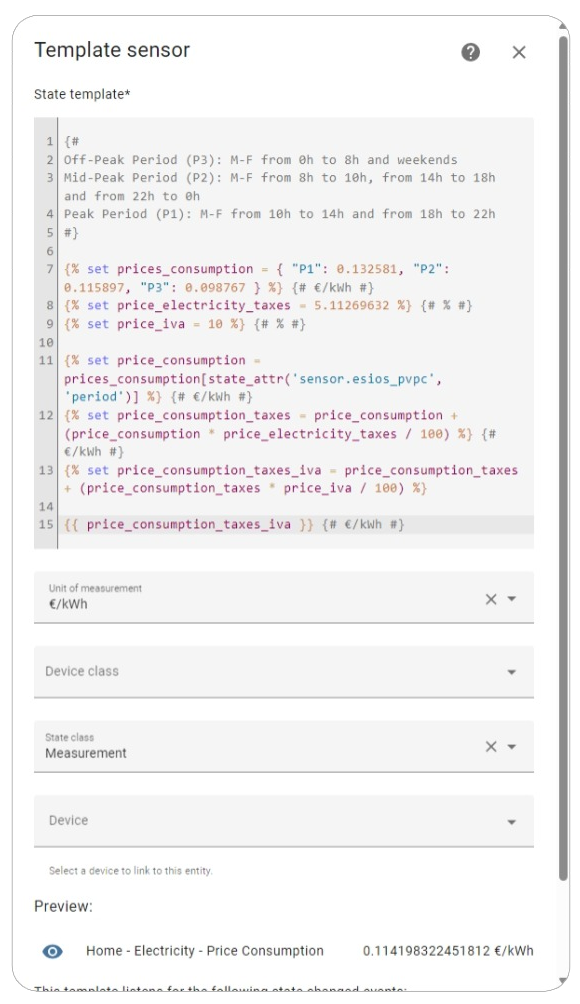
Now, let’s go back to the sensor we created with the previous rate from Settings ➡ Devices & Services ➡ Helpers. Open it, click on the gear icon to open its configuration, and then Template Options. We need to modify the code as follows:
| |
In this case, we only need to modify the name sensor.esios_pvpc to the name of the PVPC integration entity we created earlier, and the values of the variables electricity_tax and vat. The price per kWh of consumption will come from the sensor we created previously.

Save to have the new price updated every hour.
Indexed Rate
Now let’s move on to the most complex case, the indexed rate. This rate follows the schedules and periods of PVPC, but its prices are different. Therefore, we can take advantage of the periods offered by the PVPC integration we added earlier.
Again, open the sensor from Settings ➡ Devices & Services ➡ Helpers and modify its code from Template Options:
| |
In this case, we only need to modify the name sensor.esios_pvpc to the name of the PVPC integration entity we created earlier, and the values of the variables electricity_tax, vat, and consumption_prices to the prices we have contracted and that will appear on our bill.
Energy Panel
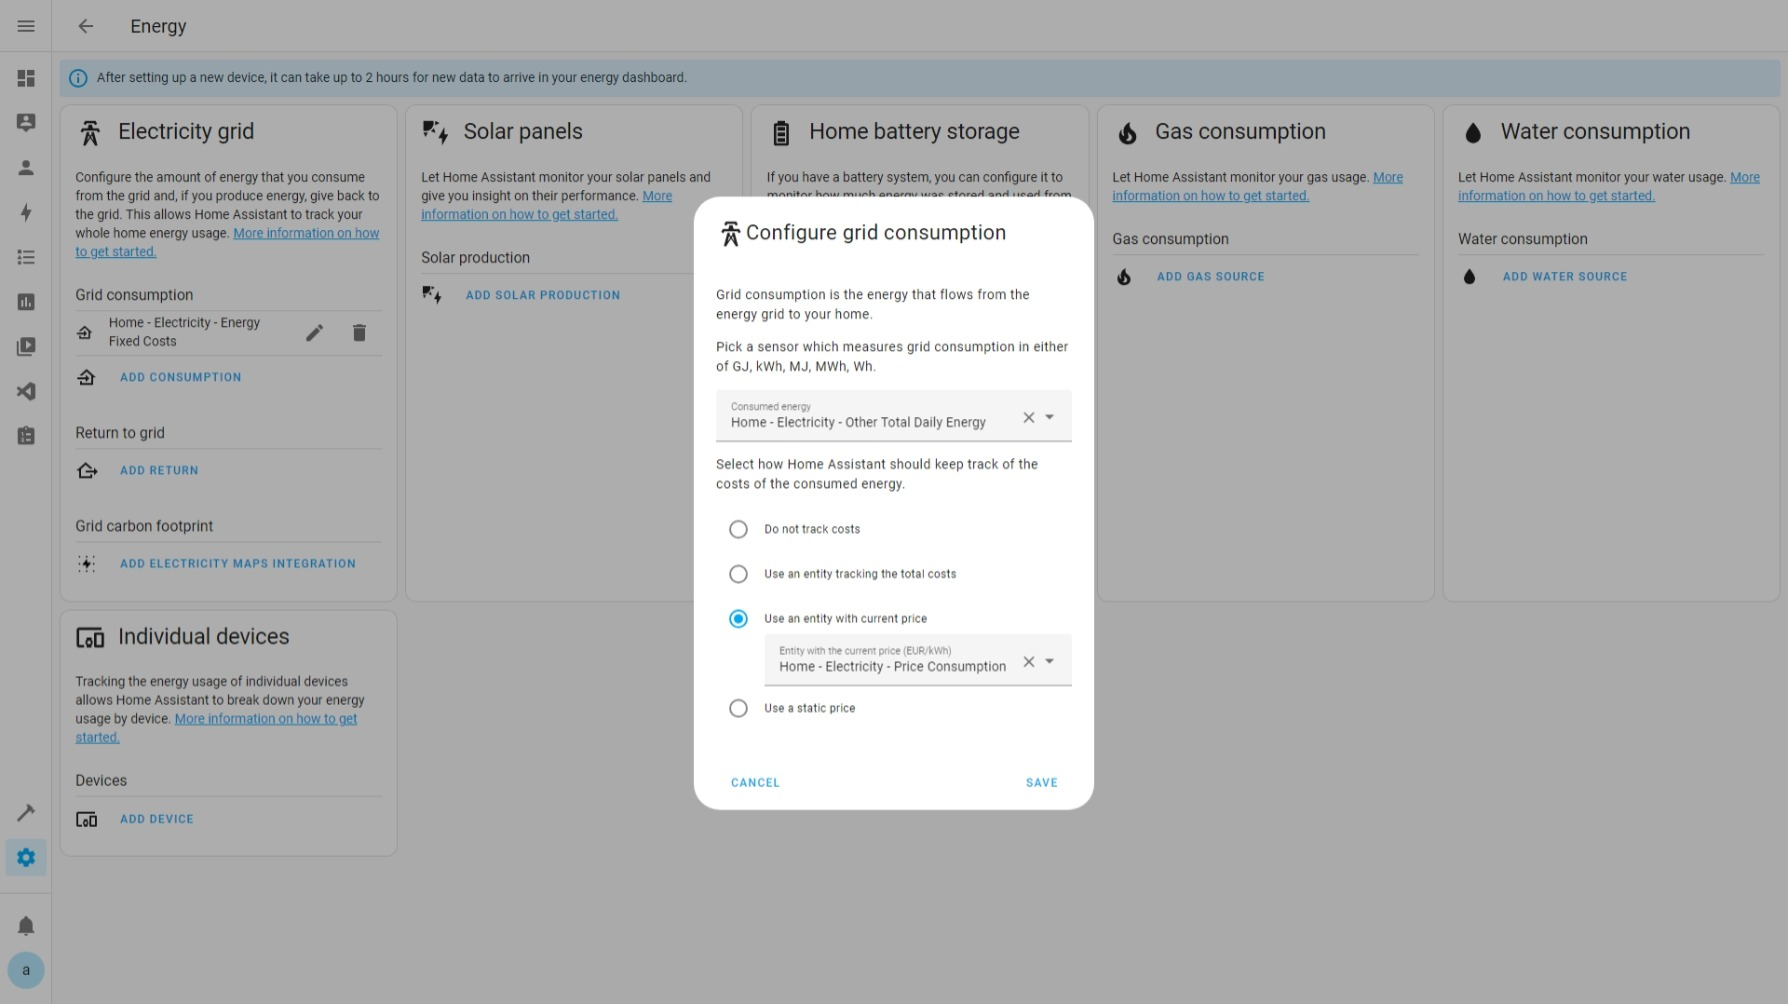
Finally, from the Energy Panel configuration, remember Settings ➡ Dashboards ➡ Energy.
Edit the consumption meter we added at the beginning of the article and select the option “Use an entity with the current price”.
Next, select the entity you just created with the consumption price in €/kWh: “Home - Electricity - Consumption Price”.
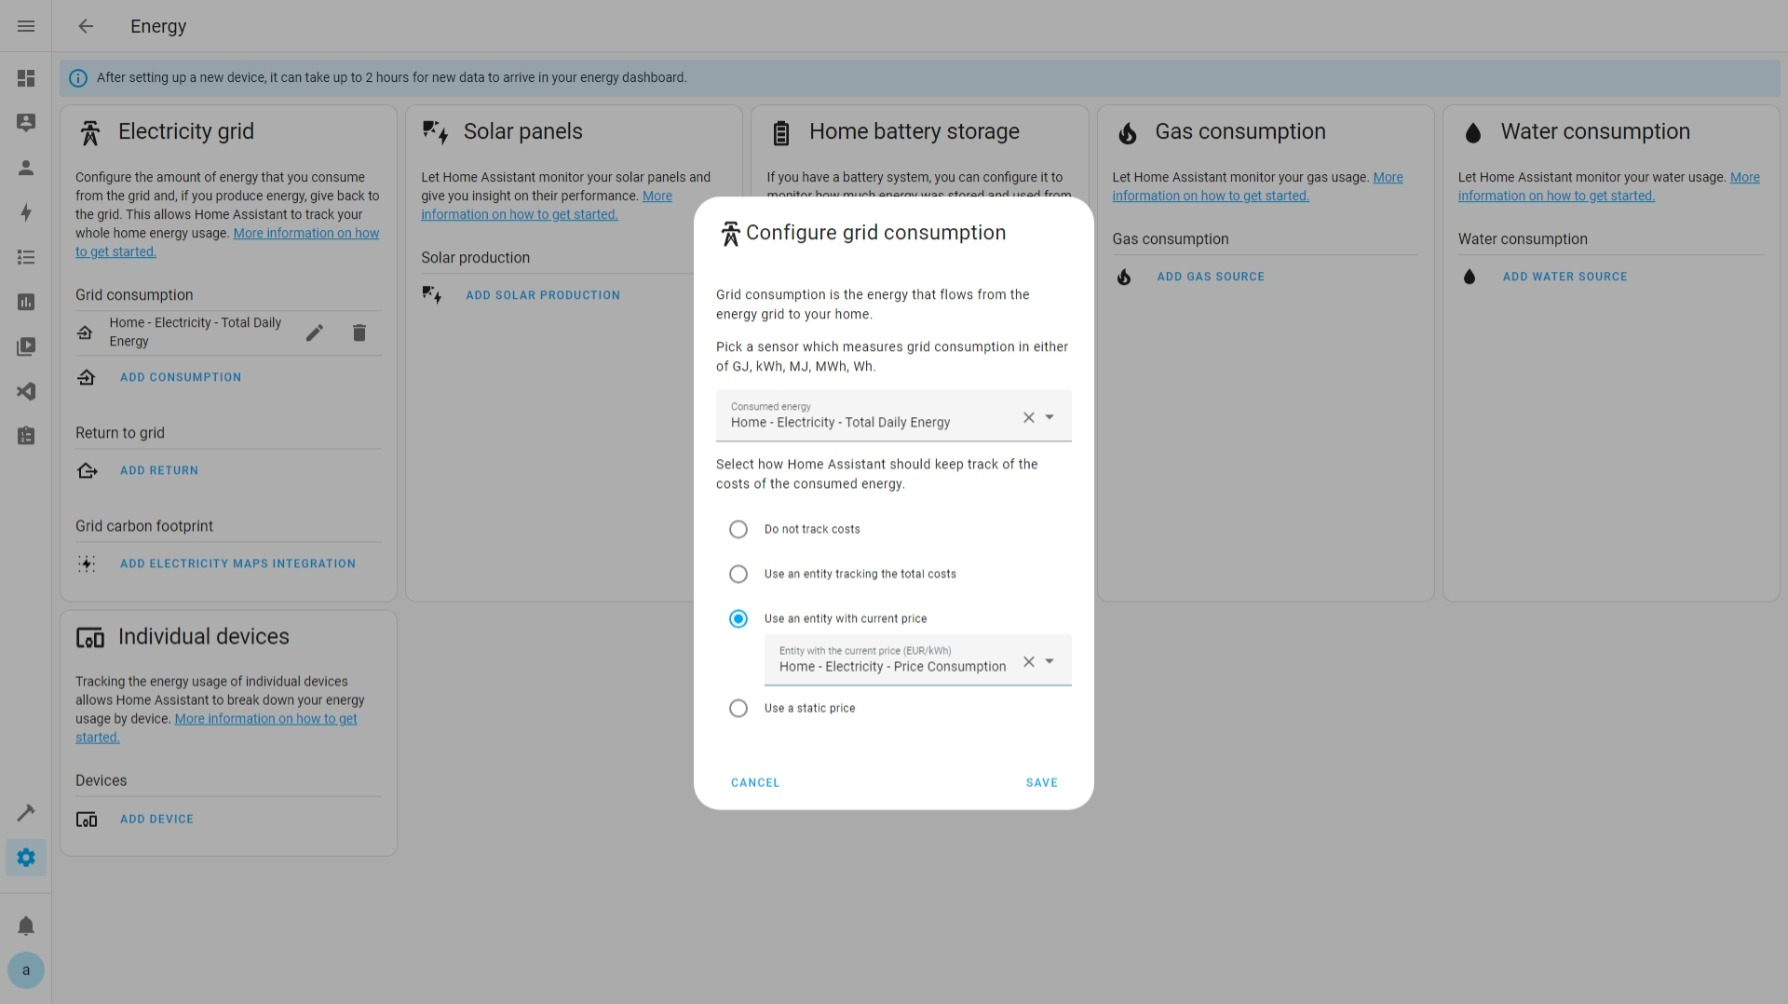
With this, we will have the total cost with taxes for our home.
Fixed Costs
So far, we have calculated the home’s consumption and its cost, but we still need to address the fixed costs part of the bill. These are expenses that do not depend on what we consume, such as the contracted power, equipment rental, and other concepts and taxes.
Keep in mind that although we will see an example here, you will need to check your bill to see which concepts are fixed and do not depend on consumption, and adapt the calculations accordingly.
Fixed Costs Energy Sensor
Regardless of the contracted rate, we will create a new energy sensor. In reality, it is a dummy sensor that will always have a value of 0 kWh, but we need to create it to include the fixed costs in the Energy Panel.
Again, from
Settings ➡ Devices & Services ➡ Helpers. We will create a Template helper of type Template Sensor.Give it a meaningful name, for example: “Home - Electricity - Fixed Costs Energy”.
In State Template, set it to 0.
In Unit of Measurement, indicate kWh.
In Class: Energy.
In State Class, select Total.
Device, leave it empty.
Finally, click Submit.

Fixed Costs Price Sensor
Once the sensor is created, we will calculate the price of the fixed costs per hour.
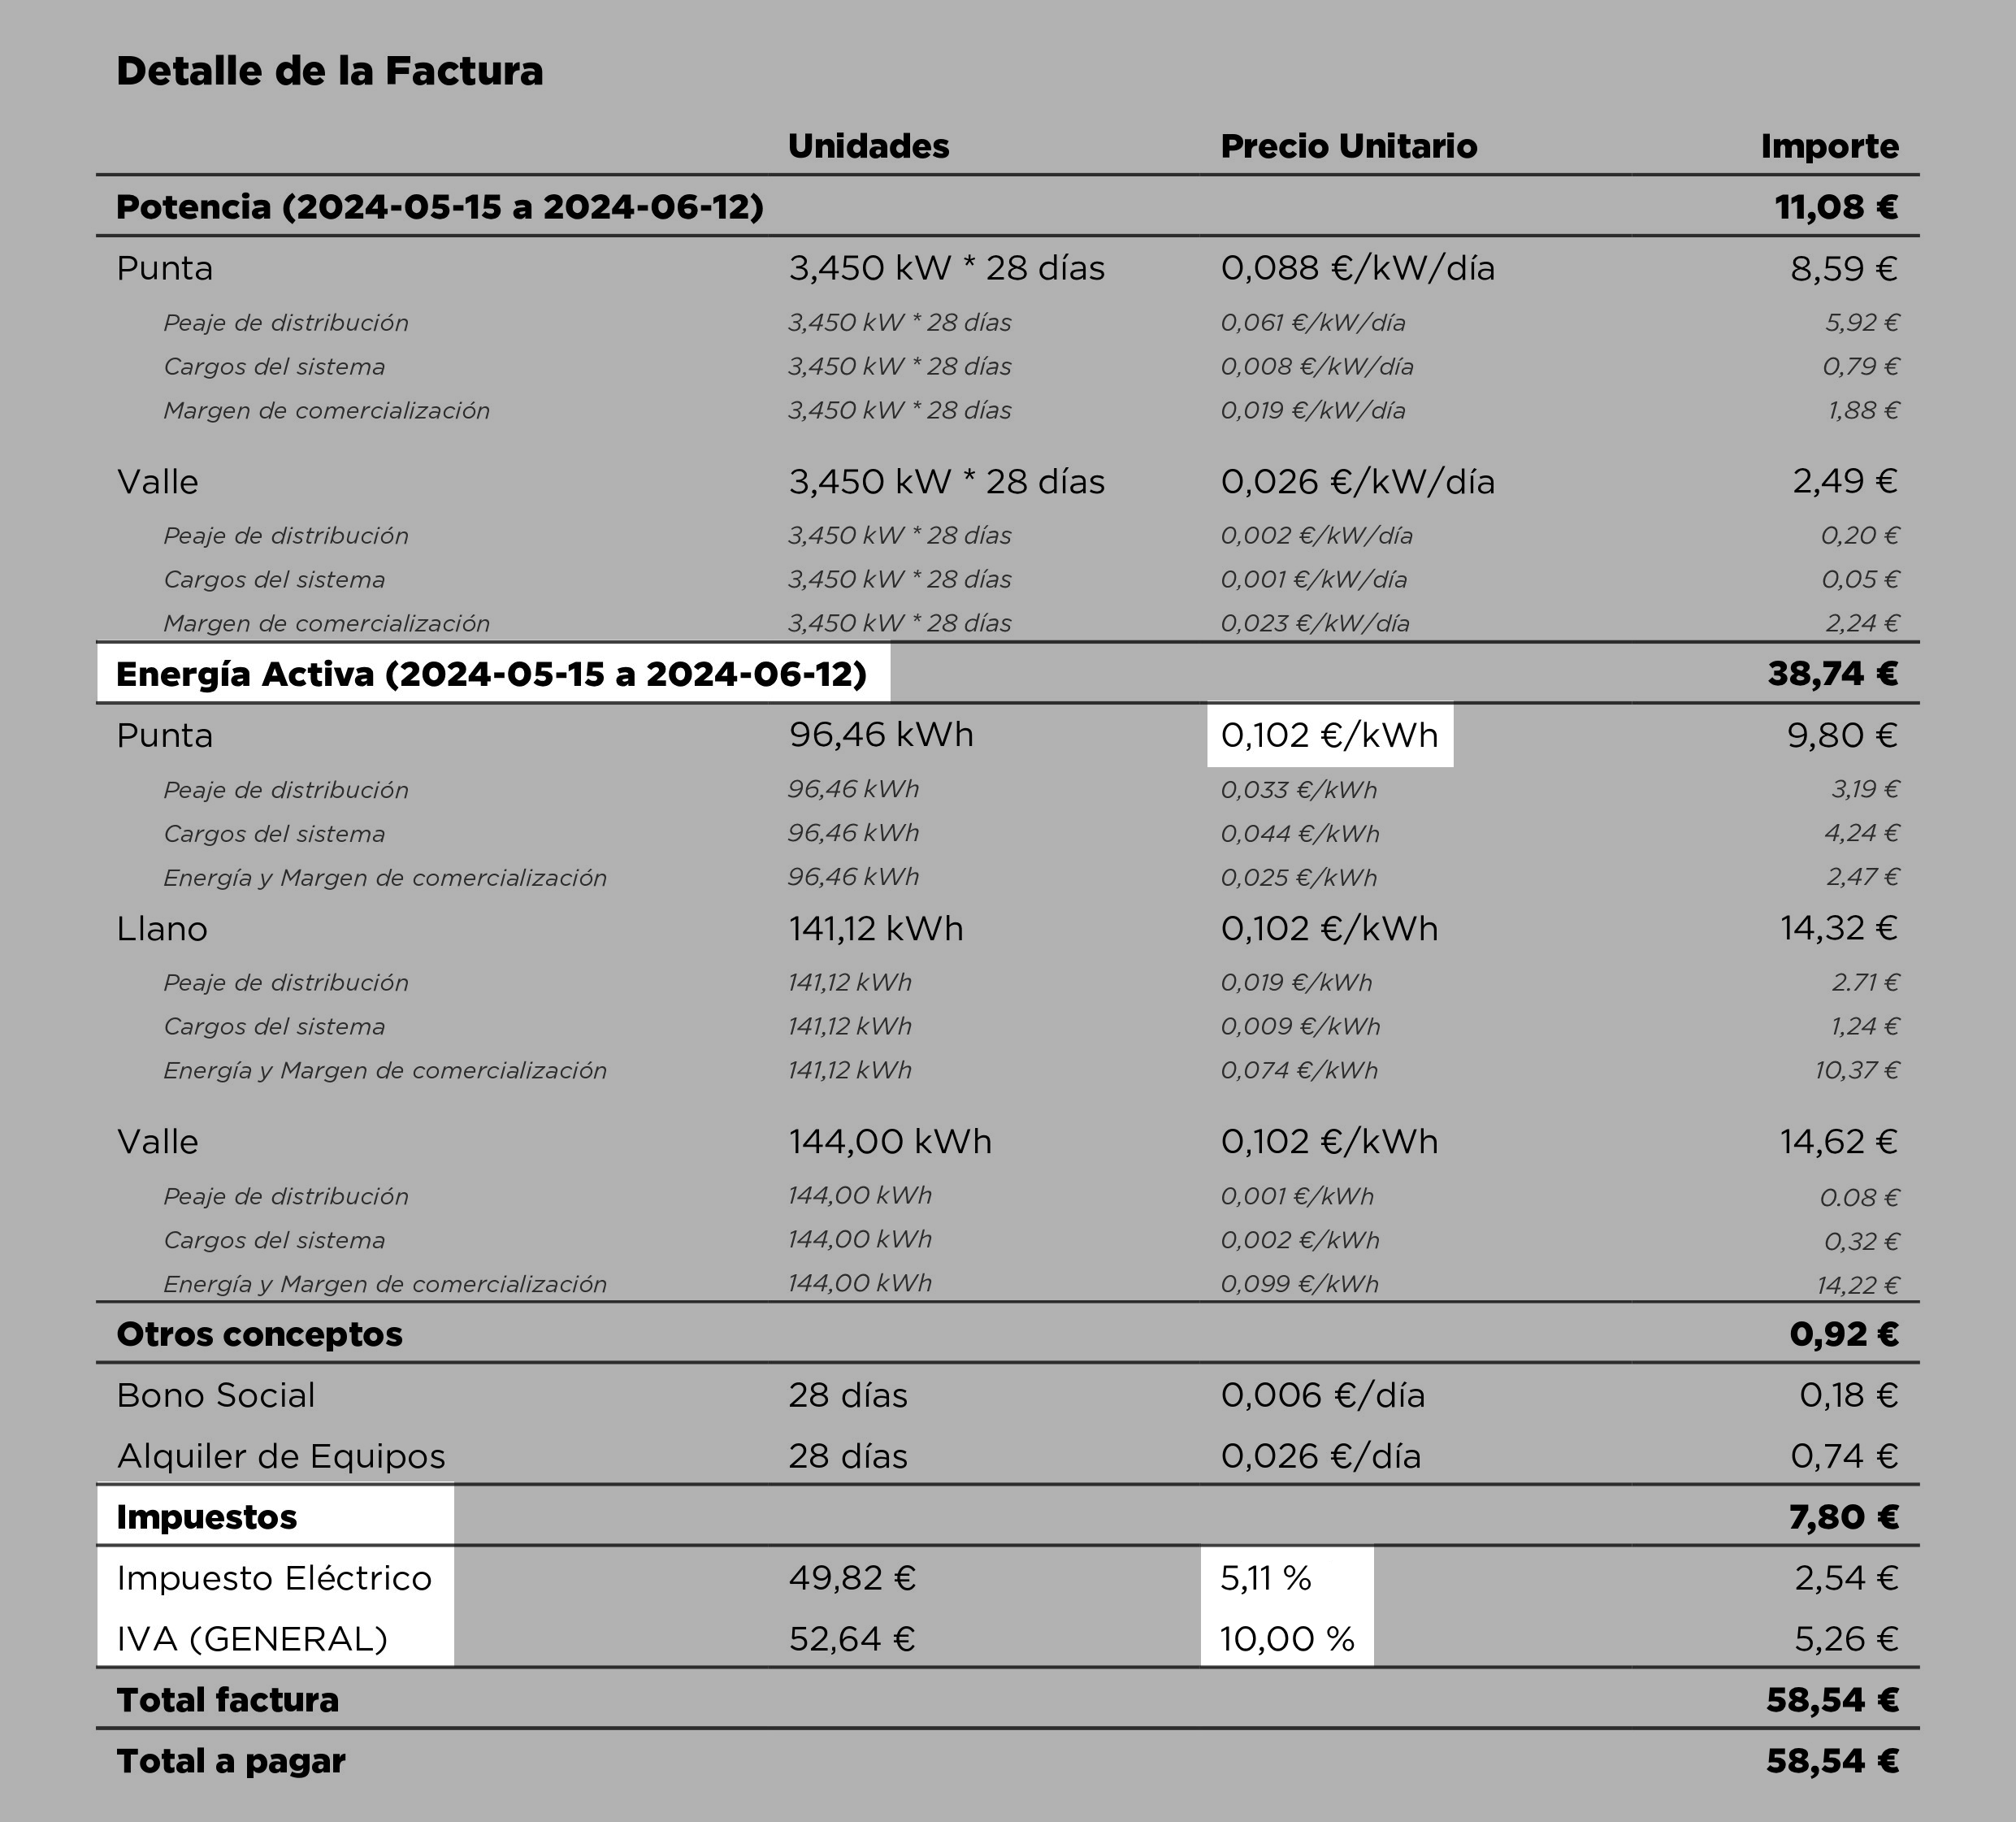
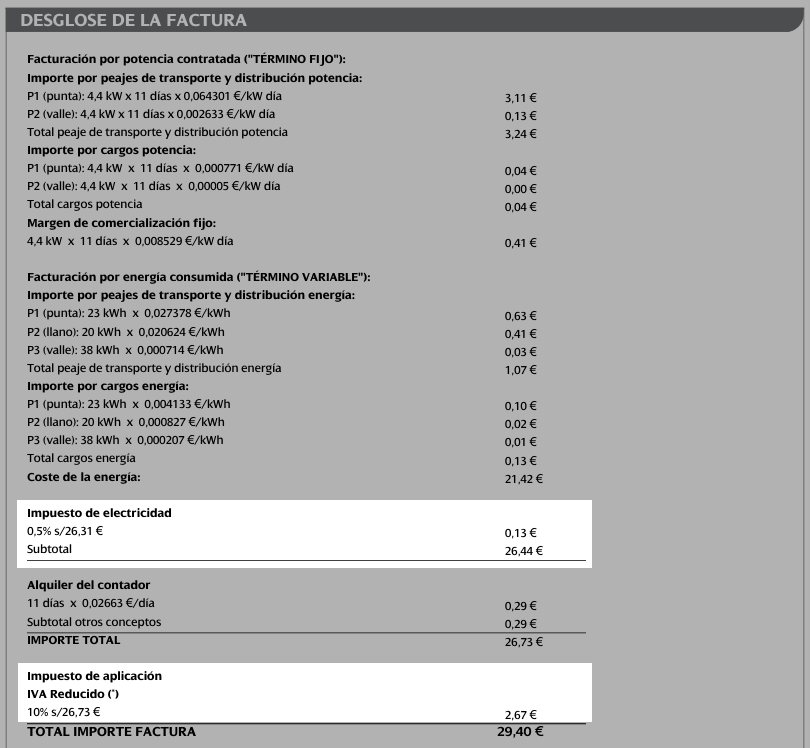
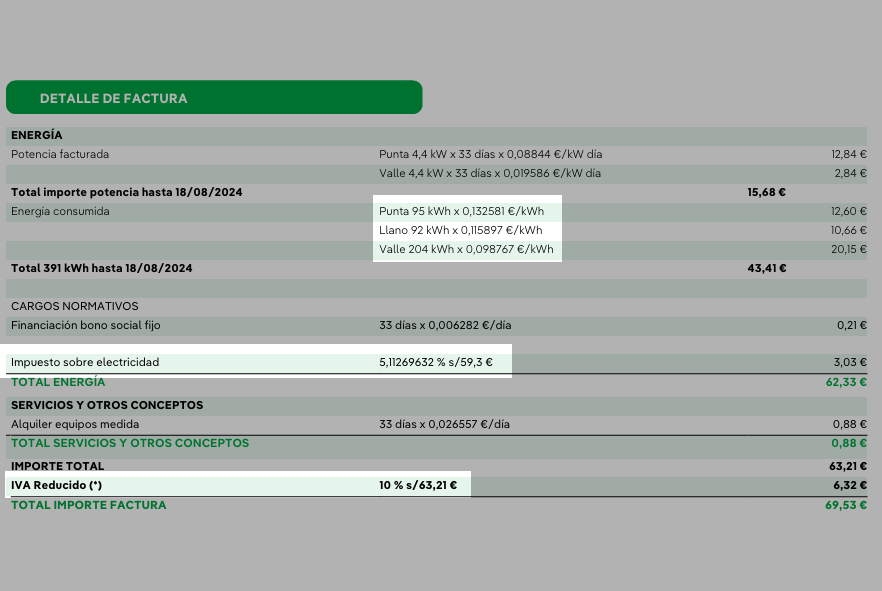
As we see in this bill, there are different concepts such as contracted power, social bond financing, and equipment rental that do not depend on consumption, are fixed in each bill, and as with consumption, these costs must be added to the percentage of electricity taxes and VAT.
Now let’s turn these into calculations in Home Assistant.
Create another Template helper of type Template Sensor, as we have done throughout the article.
Give it a name like… “Home - Electricity - Fixed Costs Price”.
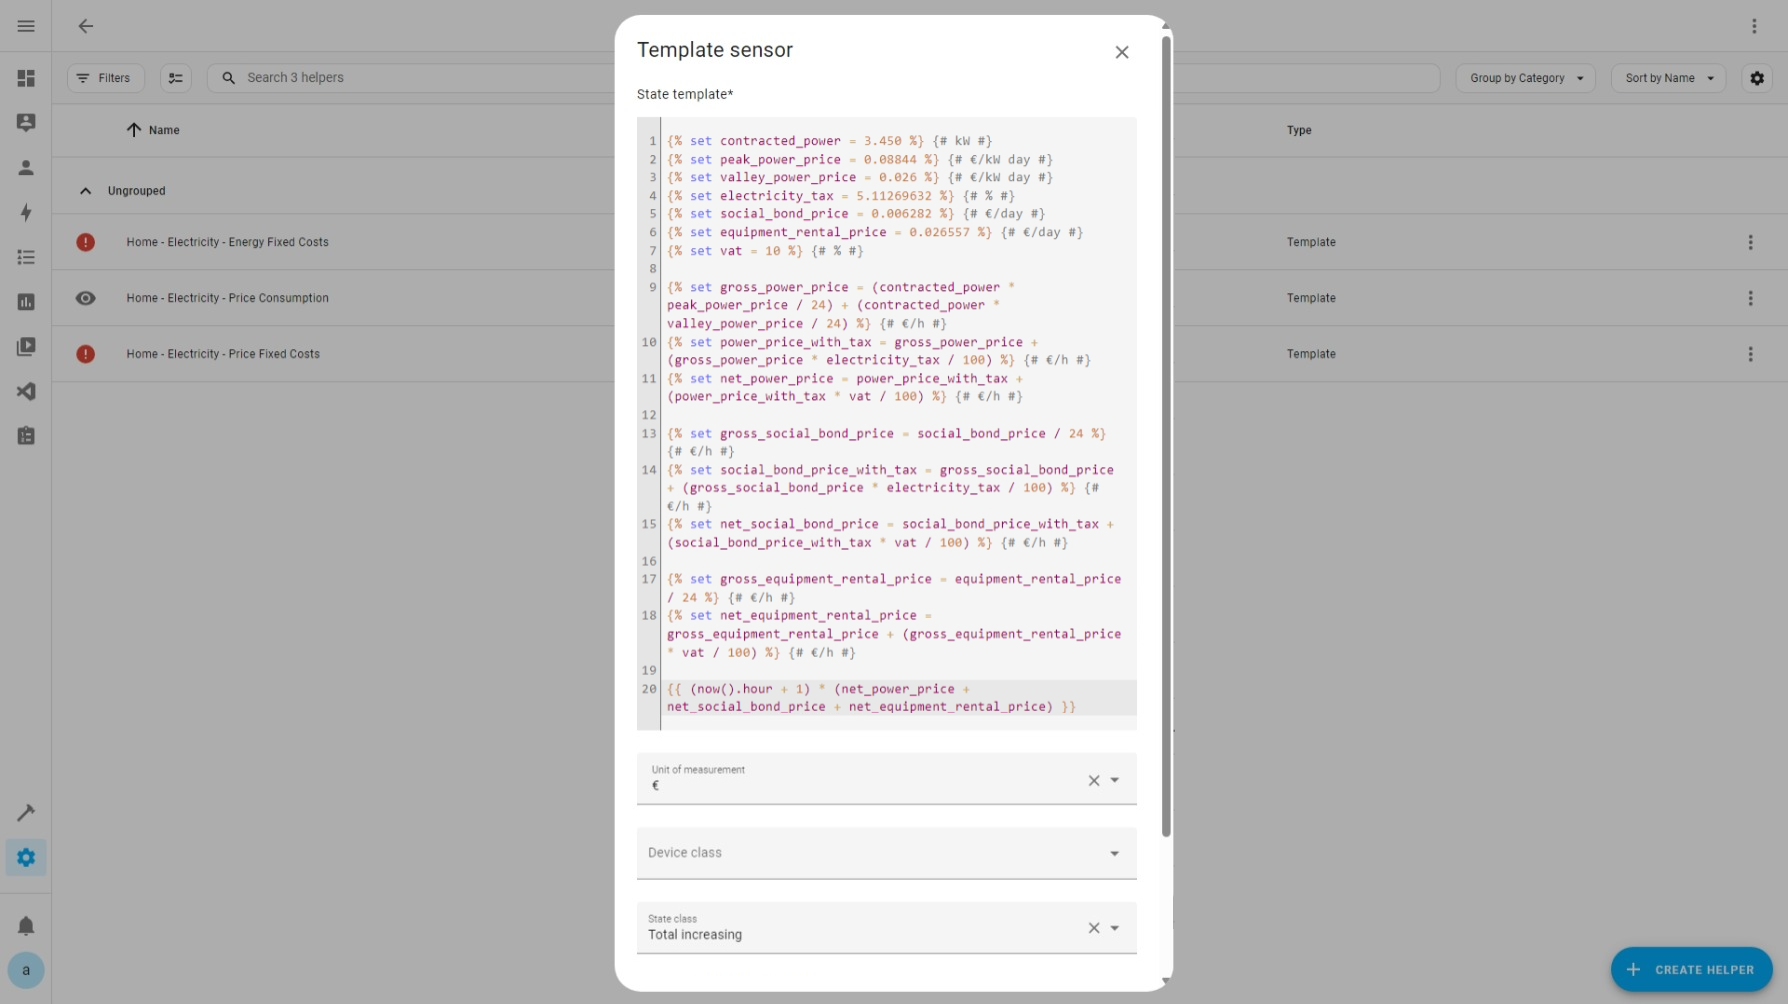
In State Template, copy and paste the following code, adapting the prices to the data and concepts that appear on your bill.
1 2 3 4 5 6 7 8 9 10 11 12 13 14 15 16 17 18 19 20{% set contracted_power = 3.450 %} {# kW #} {% set peak_power_price = 0.08844 %} {# €/kW day #} {% set valley_power_price = 0.026 %} {# €/kW day #} {% set electricity_tax = 5.11269632 %} {# % #} {% set social_bond_price = 0.006282 %} {# €/day #} {% set equipment_rental_price = 0.026557 %} {# €/day #} {% set vat = 10 %} {# % #} {% set gross_power_price = (contracted_power * peak_power_price / 24) + (contracted_power * valley_power_price / 24) %} {# €/h #} {% set power_price_with_tax = gross_power_price + (gross_power_price * electricity_tax / 100) %} {# €/h #} {% set net_power_price = power_price_with_tax + (power_price_with_tax * vat / 100) %} {# €/h #} {% set gross_social_bond_price = social_bond_price / 24 %} {# €/h #} {% set social_bond_price_with_tax = gross_social_bond_price + (gross_social_bond_price * electricity_tax / 100) %} {# €/h #} {% set net_social_bond_price = social_bond_price_with_tax + (social_bond_price_with_tax * vat / 100) %} {# €/h #} {% set gross_equipment_rental_price = equipment_rental_price / 24 %} {# €/h #} {% set net_equipment_rental_price = gross_equipment_rental_price + (gross_equipment_rental_price * vat / 100) %} {# €/h #} {{ (now().hour + 1) * (net_power_price + net_social_bond_price + net_equipment_rental_price) }}What we achieve with these calculations is to convert all costs to an hourly price, and the sensor output indicates the current hour, multiplied by the calculated price. This way, we will have the accumulated cost throughout the day every hour, and when midnight arrives, the accumulation will reset.
In Unit of Measurement, select €.
In State Class, select Total Increase.
Leave the rest of the fields empty.
Now, click Submit.
Energy Panel
Now that we have both sensors configured, we will add a new Grid Consumption from Electric Grid in the Energy Panel. Follow these steps:
From
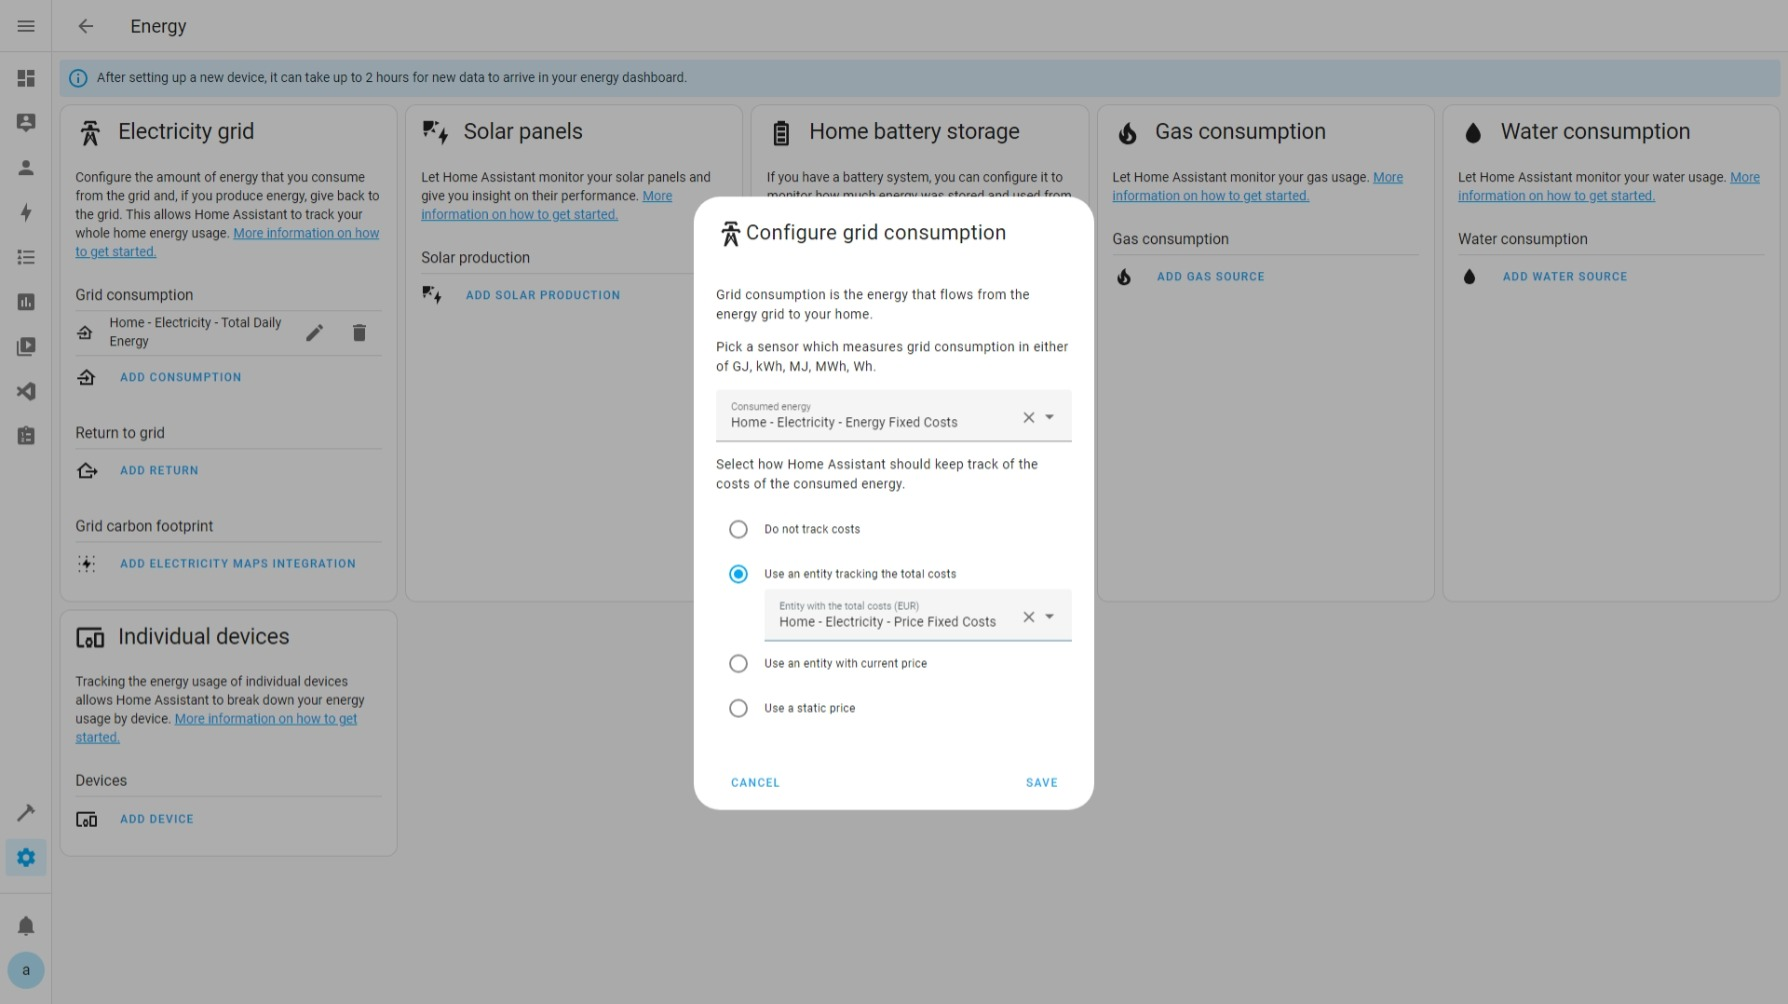
Settings ➡ Dashboards ➡ Energy, select Add Grid Consumption.In the Consumed Energy field, select the sensor “Home - Electricity - Fixed Costs Energy” that we created.
Select the option “Use an entity that tracks total costs” and as the entity, select the sensor “Home - Electricity - Fixed Costs Price” that we created in the previous step.
Save, and open Energy from the Side Panel.
Surely, as with consumption, we will have to wait 2-3 hours to see the results. When ready, you will see a new source, which always shows 0 kWh, but whose cost increases throughout the day.
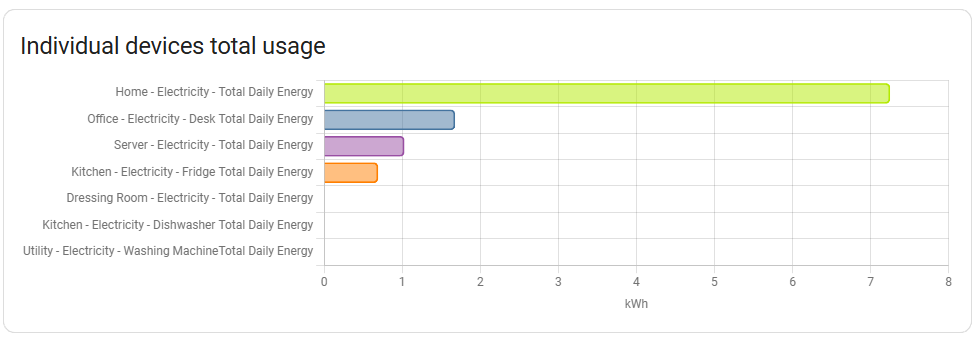
Price per Device or Line
Finally, as an extra step, we will calculate the expenses and costs of different devices, plugs, lines… that we have monitored with consumption meters around the house.
During the configuration of the Energy Panel, you know, from Settings ➡ Dashboards ➡ Energy, you will have seen the Individual Devices section.
In it, we can add individual devices or lines to break down the house’s consumption. The problem is that if we only add the devices, there will be part of the consumption that we won’t see, and if we add the total house consumption along with the devices, the breakdown will be incorrect.
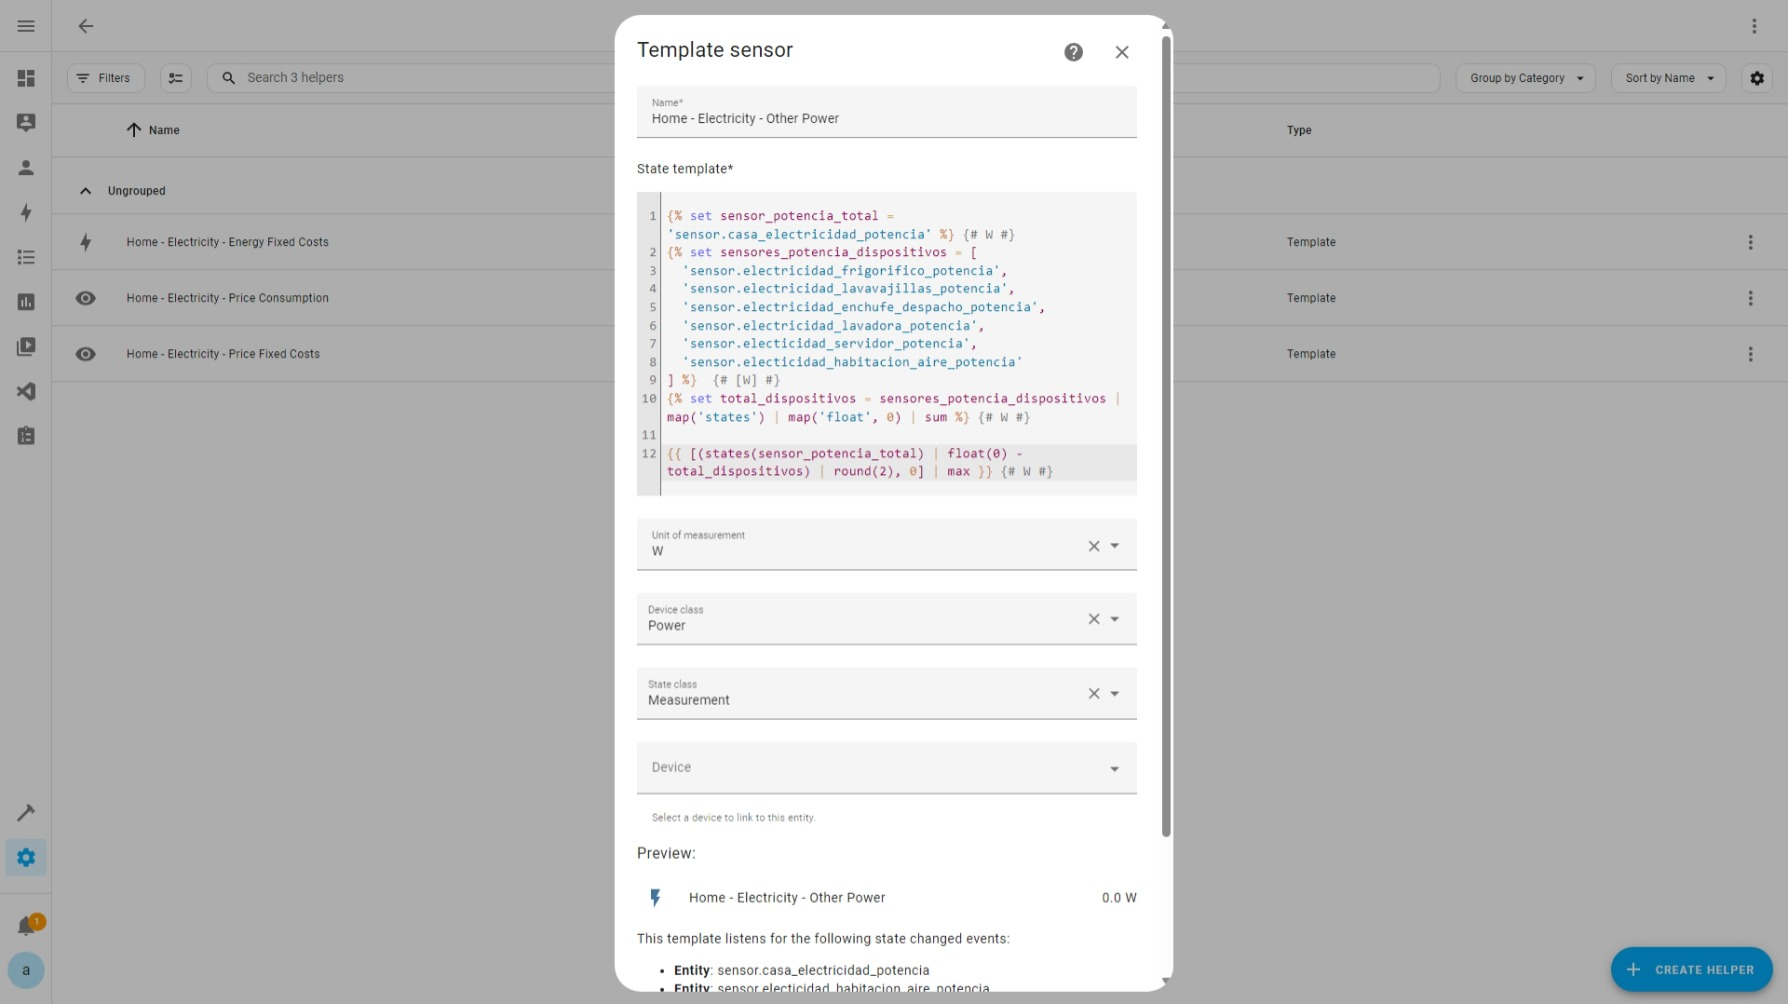
Other Power Sensor
We will create a sensor that gives us the value of those watts that we don’t see. This way, we can use it as if it were another device.
From
Settings ➡ Devices & Services ➡ Helpers. We create a new Template helper of type Template Sensor.In Name, we put something like “Home - Electricity - Other Power”.
In State Template, we copy and paste the following code:
 1
 2
 3
 4
 5
 6
 7
 8
 9
10
11
12
{% set total_power_sensor = 'sensor.home_electricity_power' %} {# W #} {% set device_power_sensors = [ 'sensor.electricity_fridge_power', 'sensor.electricity_dishwasher_power', 'sensor.electricity_office_plug_power', 'sensor.electricity_washing_machine_power', 'sensor.electricity_server_power', 'sensor.electricity_bedroom_air_power' ] %} {# [W] #} {% set total_devices = device_power_sensors | map('states') | map('float', 0) | sum %} {# W #} {{ [(states(total_power_sensor) | float(0) - total_devices) | round(2), 0] | max }} {# W #}We will need to change the value of
total_power_sensorto the sensor with the total house power, and the list in thedevice_power_sensorsvariable to the other consumption meters we have.In Unit of Measurement, select W.
In Device Class, select Power.
In State Class, select Measurement.
Leave the rest of the fields empty.
Now, click Submit.
Each time we add or remove consumption meters in Home Assistant, we will need to modify the list of devices.
Note that all sensors use the same unit of measurement, Watts. Make sure all your sensors do too.
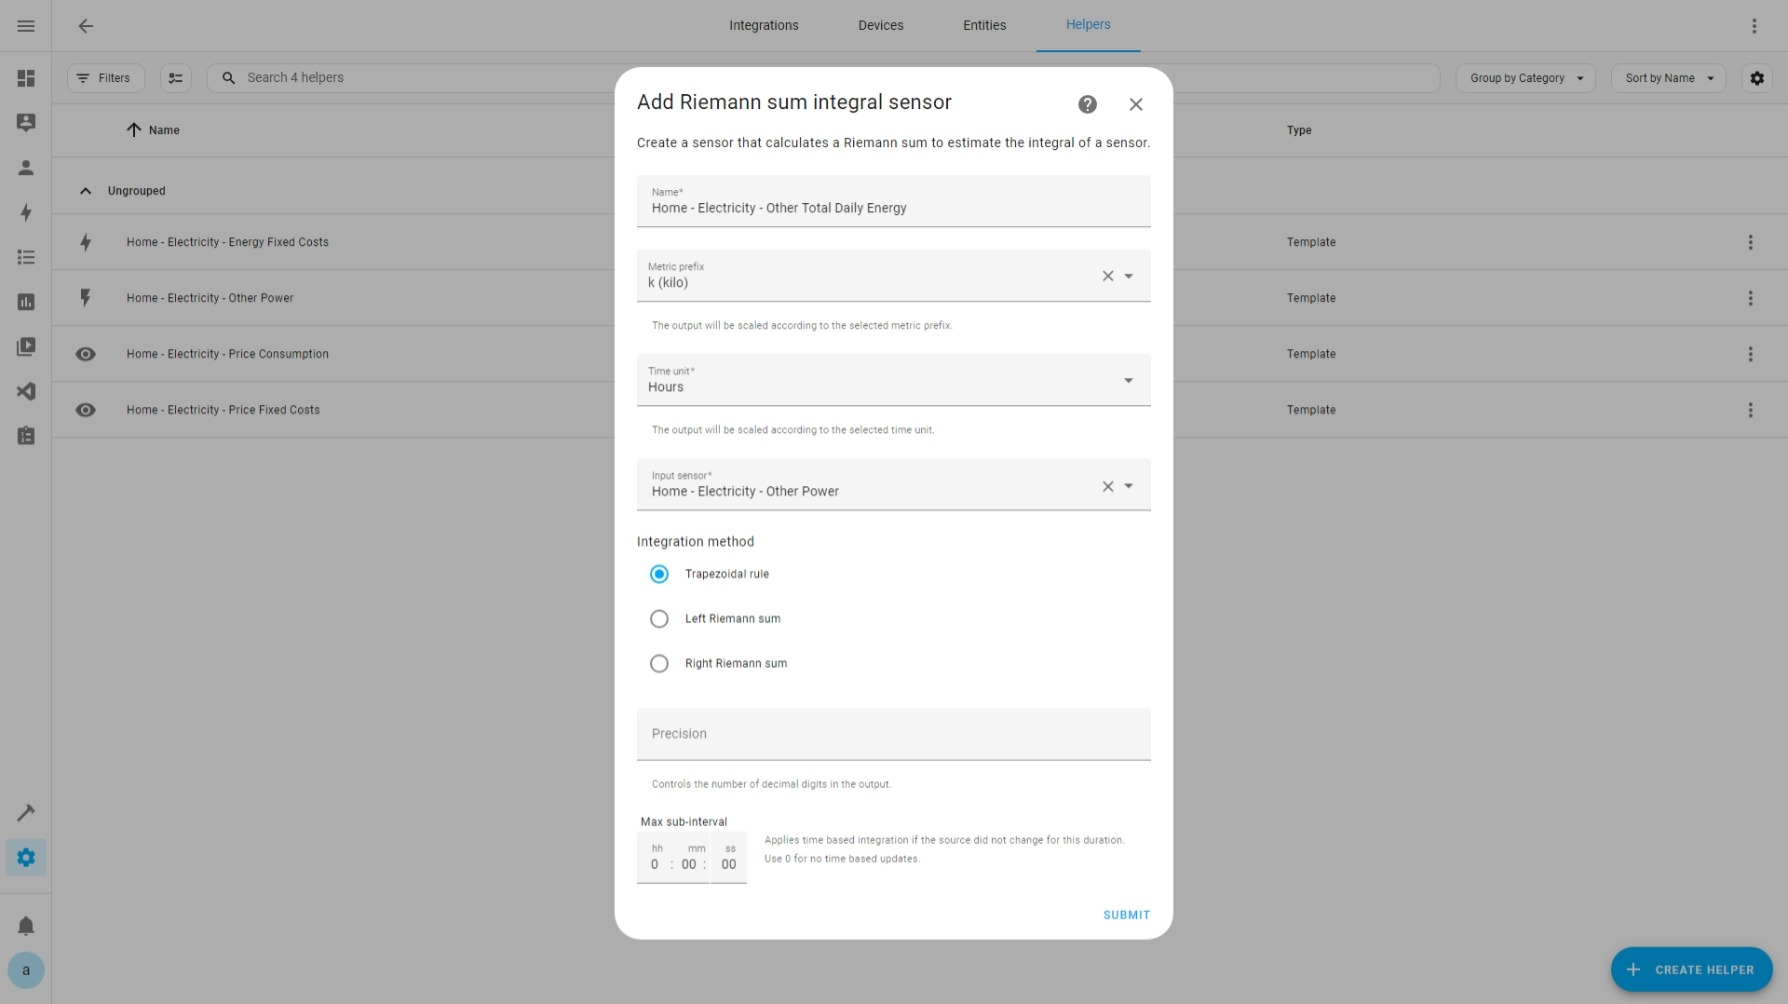
Other Energy Sensor
As we did at the beginning of this article and to use this sensor in the Energy Panel, we need to transform the previous power sensor into an energy sensor.
Create Helper
- From
Settings ➡ Helpers ➡ Create Helper, create an Integral Sensor helper.
- From
Configure the Integral Sensor
- Assign a Name, for example, “Home - Electricity - Other Total Daily Energy”.
- In Metric Prefix, select “kilo (k)”.
- In Time Unit, select “Hours”.
- In Input Sensor, select the entity we just created before “Home - Electricity - Other Power”.
- In Integration Method, select “Left Riemann Sum” or “Trapezoidal Rule”.
Save and Verify New Entity
- Save the changes, and you will see a new entity created. Initially, it will have a value of 0 kWh until an hour passes and the calculation is performed.
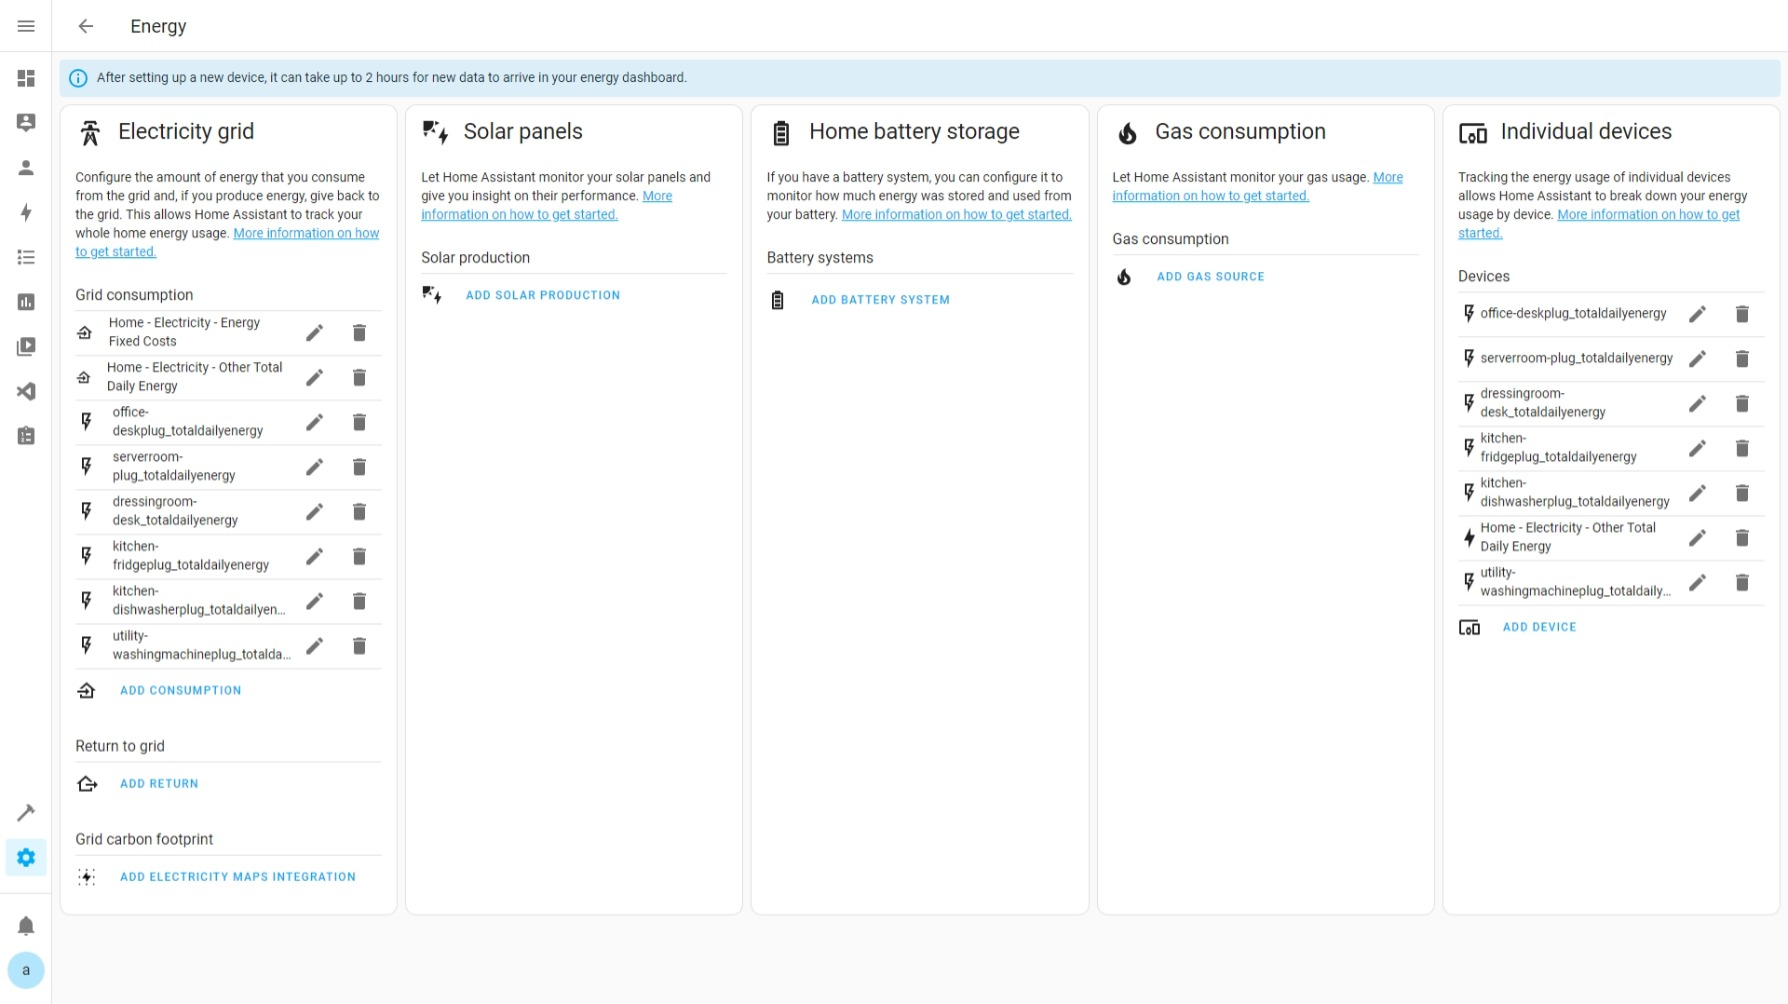
Energy Panel
Now we can remove the total house sensor, and add the other energy sensor and the other entities that break down the consumption. If the rest of the sensors do not have the Energy type, remember that you can convert power in watts to energy in watt-hours using the Riemann integration we just performed in the previous step.
Returning to the Energy Panel:
From
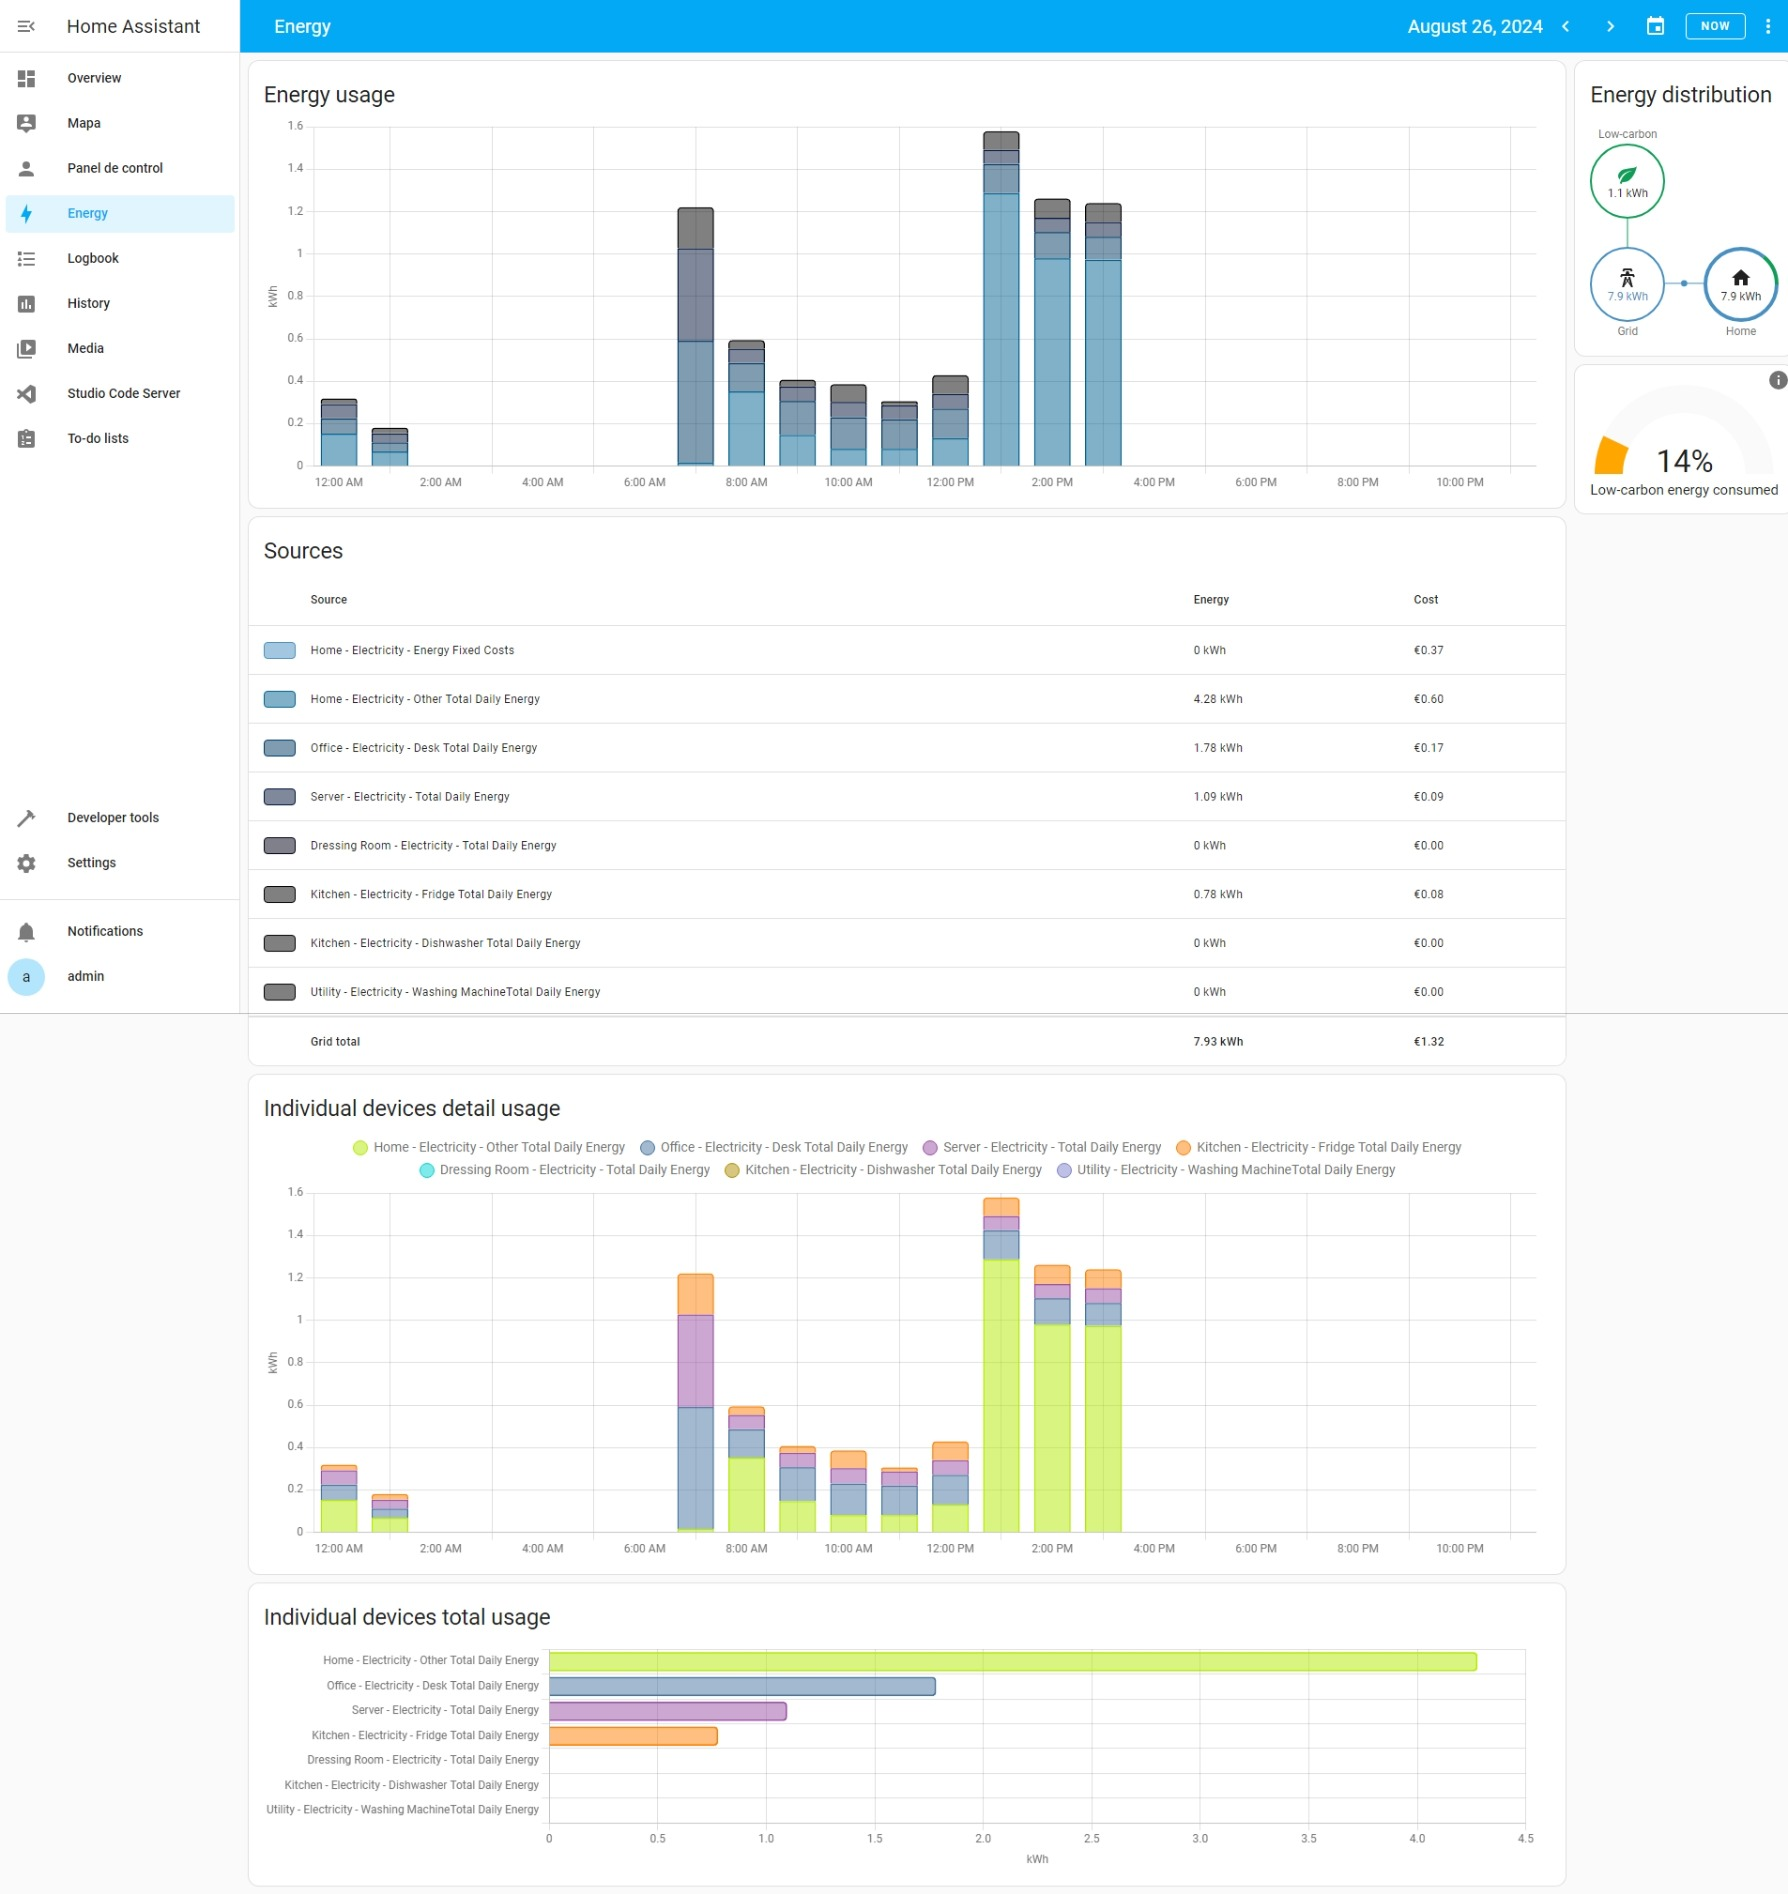
Settings ➡ Dashboards ➡ Energy, add all the consumption meters, except the total house sensor, to the Individual Devices section. This will give us the breakdown of consumption to see which elements of the house consume more and which consume less.Now, in the same configuration, in the Electric Grid section, add all the breakdowns again, including the other consumption. Remember not to delete the Fixed Costs.
To see how much each of them costs us, we can open the configuration of each one, select the option “Use an entity with the current price” and finally select the “Consumption Price” entity that we previously calculated.
We wait 2-3 hours and we will start to see the consumption and their costs.
Conclusion
With this data, you will be able to visualize and control your electrical consumption and expenses, allowing you to make decisions to reduce your bills and optimize energy use in your home.
Don’t forget to check out the Telegram group for more content on home automation. See you in the next article!